
To avoid veneer tape marks and telegraphing under finish, you need to guarantee a smooth surface by sanding correctly and cleaning it thoroughly. Use high-quality painter’s tape, applying it without stretching for a firm seal. When removing the tape, do it slowly at a 45-degree angle to prevent damage. Timing is essential; pull the tape while the finish is slightly tacky. Master these techniques, and you’ll be on your way to a flawless finish. Discover more methods to perfect your project.
Key Takeaways
- Ensure thorough surface preparation by sanding and cleaning to create a smooth base for finishing.
- Use high-quality painter’s tape that minimizes residue and adheres well to clean surfaces.
- Apply tape firmly to eliminate air bubbles and create an even seal against paint seepage.
- Remove tape slowly at a 45-degree angle while the finish is still slightly tacky for clean results.
- Test a small area first to evaluate the finish’s reaction to tape, adjusting techniques as needed.

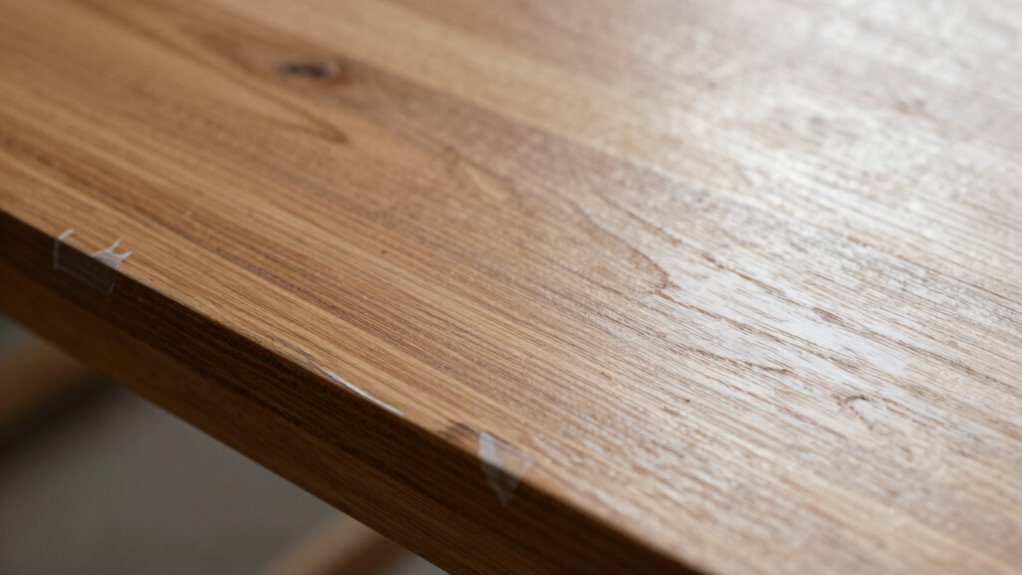
When working with veneer, avoiding tape marks can be a real challenge. You’ve probably encountered those pesky lines that show up after applying tape during your projects. These marks can ruin an otherwise flawless finish, so it’s vital to nail down your tape application and surface preparation techniques. The key lies in how you prepare your surface and the care you take while applying and removing tape.
First off, think about the surface you’re working on. Proper surface preparation is essential. Make sure to sand the veneer smoothly, removing any imperfections that could highlight tape marks later. Start with a coarser grit and gradually move to a finer one, ensuring you’re left with a clean and even surface that’s ready for finishing. If you skip this step, the uneven texture might cause the tape to lift or leave impressions, leading to those unwanted marks. Using the appropriate surface preparation techniques can significantly improve your results. Additionally, understanding the adhesion properties of your finish can help you choose the right timing for tape removal.
Next, when you’re ready to apply tape, choose a high-quality painter’s tape. This tape is specifically designed to minimize residue and marks. Before applying the tape, make sure your surface is clean and free of dust or oils. A quick wipe down with a clean cloth can do wonders. Once you’ve done that, apply the tape with a steady hand, ensuring it adheres well to the surface. Avoid stretching the tape; if you pull it too tightly, it may not stick properly, which could cause it to lift and leave marks when you remove it.
After applying the tape, take a moment to press it down firmly, ensuring an even seal. This simple step can greatly reduce the chances of paint seeping under the tape, which also contributes to tape marks. When you’re ready to remove the tape, do it slowly and at a 45-degree angle. This technique helps to lift the tape without pulling away any of the veneer or finish beneath it.
Lastly, consider the timing of your tape removal. If you wait too long after finishing, the tape could bond with the finish, making it harder to remove cleanly. Try to pull it off while the finish is still slightly tacky. This way, you minimize the risk of lifting any veneer or leaving behind tape marks. Understanding the working time of your finishing materials can help you determine the optimal removal time for best results. It’s also beneficial to test a small area first to see how your particular finish reacts to tape removal.
With careful attention to your surface preparation and tape application, you’ll greatly reduce the chances of tape marks ruining your veneer projects. Each step counts, so take your time and enjoy the process!

ScotchBlue Original Multi-Surface Painters Tape, 2 Inch Wide (1.88 in. x 60 Yds), 1 Roll Blue Paint Tape Protects Surfaces & Removes Easily, Masking Tape for Indoor and Outdoor Use (2090-48NC)
BLUE PAINTER'S TAPE: Includes One 1.88 in x 60 yd roll of ScotchBlue Original Painter's Tape, a blue…
As an affiliate, we earn on qualifying purchases.
As an affiliate, we earn on qualifying purchases.
Frequently Asked Questions
What Types of Veneer Tape Are Best for Preventing Marks?
For preventing marks, opt for veneer tape with strong adhesive properties and a suitable tape thickness. Thinner tapes often conform better to surfaces, reducing the chance of telegraphing. Look for tapes specifically designed for woodworking, as they usually offer a balance between adhesion and easy removal without residue. Testing a few different types on scrap wood can help you find the best option for your projects and guarantee a smooth finish.
How Does Humidity Affect Veneer Tape Adhesion?
Humidity can be a sneaky foe when it comes to veneer tape adhesion. You might find that excess moisture creates adhesion challenges, making the tape less effective. The tape can struggle to stick properly, leading to unsightly marks later on. To combat this, try working in a controlled environment where humidity levels are stable. That way, you’ll guarantee a smooth finish and keep those pesky adhesion issues at bay.
Can I Use Regular Tape Instead of Veneer Tape?
No, you can’t use regular tape instead of veneer tape. Regular tape doesn’t have the same adhesion properties and can leave residue or damage the veneer surface. Consider tape alternatives specifically designed for veneer applications; they provide better adhesion without compromising the finish. Using the right tape guarantees a smooth application, minimizing the risk of marks showing through once you apply your final finish. Always prioritize quality for the best results.
What Tools Are Essential for Applying Veneer Tape Properly?
For proper veneer tape application, you’ll need a few essential tools. Start with a sharp utility knife for precise cuts and a roller for even adhesion. A straightedge helps guarantee clean lines, while a heat source can activate the adhesive if your tape requires it. Don’t forget proper tape storage; keep your veneer tape in a cool, dry place to maintain its effectiveness. With the right tools, your application will be smooth and professional.
How Long Should Veneer Tape Be Left on Before Finishing?
Think of veneer tape as a delicate bridge; it needs time to bond. You should leave it on for at least 24 hours before finishing. This allows for ideal adhesion and helps prevent any tape removal techniques from damaging your work. If you’re enthusiastic to start, just remember that veneer finish timing is essential. Rushing can lead to unsightly marks, so patience pays off in the end!
Drywall Wet Sanding Sponge, Washable Double Sided Drywall Finishing Sponge
【Dustless Drywall Sanding Sponge】This drywall sponge for wet sanding traps dust by using water during sanding, making it…
As an affiliate, we earn on qualifying purchases.
As an affiliate, we earn on qualifying purchases.
Conclusion
In summary, avoiding veneer tape marks is essential for achieving a flawless finish. By being mindful of your application techniques and choosing the right tape, you can prevent those frustrating telegraphing issues. Isn’t it worth the extra effort to guarantee your project looks its absolute best? Remember, a little attention to detail now can save you time and heartache later. So, take pride in your work and enjoy the satisfaction of a perfect finish!

Aunt Fannie's All Purpose Wood Spray Cleaner, Lemon, 16.9 oz, Pack of 1
Aunt Fannie's All Purpose Wood Cleaning Spray: Contains 16.9 ounces of lemon-scented natural plant-based cleaner that breaks down…
As an affiliate, we earn on qualifying purchases.
As an affiliate, we earn on qualifying purchases.

Bahco BAH4741500.8 Cabinet Scraper, 6" x 2.5" x 0.030", Precision Chrome-Nickel Steel Blade for Fine Detailing, Varnish Removal, and Furniture Restoration in Woodworking Applications
CHROME-NICKEL PRECISION: Crafted from cold-rolled, hardened, and tempered chrome-nickel steel, this scraper delivers long-lasting edge retention and control…
As an affiliate, we earn on qualifying purchases.
As an affiliate, we earn on qualifying purchases.