Splines for miters are small inserts that reinforce joint strength and improve alignment, making your projects more durable and professional-looking. By fitting snugly into cross-cut grooves, they distribute stress evenly and prevent gaps or misalignments over time. Choosing the right material and installing them properly can transform basic miter joints into lasting connections. If you want to master this simple yet powerful technique, keep going to discover how to create perfect splines every time.
Key Takeaways
- Splines reinforce miter joints by providing additional strength and preventing gaps over time.
- They help maintain precise alignment, ensuring seamless and professional-looking miters.
- Made from matching or contrasting woods, splines can add decorative appeal to corners.
- Proper installation involves accurate cutting, gluing, clamping, and sanding for a smooth finish.
- Using splines significantly improves joint durability, stability, and aesthetic quality in woodworking projects.

Rockler Deluxe Spline Jig for Table Saw & Router Table – Adjustable Box Joint Fixture with 45 Degree Miter Sled, Finger Joint & Picture Frame Jig for Decorative Woodworking Joinery.
Versatile Joinery Jig: Create decorative and joint-reinforcing splines for boxes, frames, cabinets, picture frames, and woodworking projects; works…
As an affiliate, we earn on qualifying purchases.
As an affiliate, we earn on qualifying purchases.
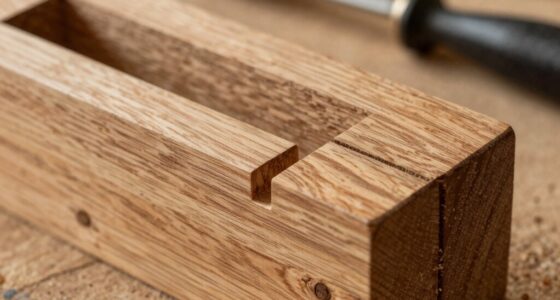
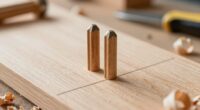
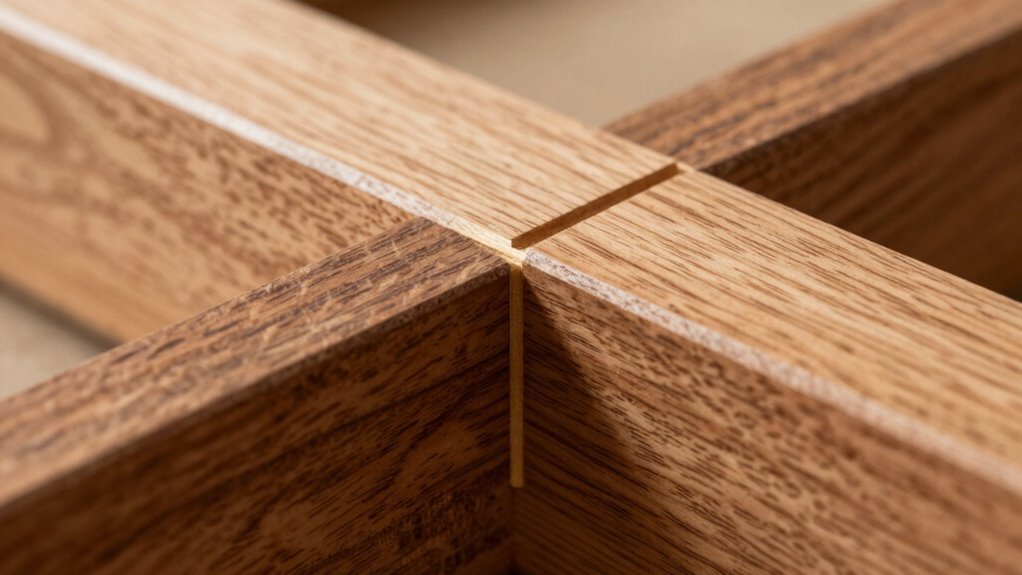
What Are Splines for Miters and Why Use Them?

Have you ever struggled to achieve a perfect miter joint in woodworking? That’s where splines come in. These small, narrow strips of wood or other materials are inserted into grooves cut across the mitered edges. They provide joint reinforcement, making your corners stronger and more stable over time. But splines do more than just add strength—they also serve as decorative accents. When you choose contrasting woods or carve intricate shapes, they subtly enhance the visual appeal of your project. Using splines helps keep your miter joints aligned precisely, preventing gaps and misalignments. Whether you’re building picture frames, furniture, or decorative boxes, splines offer both functional support and aesthetic charm, elevating your woodworking craftsmanship to the next level. Additionally, understanding wood joint fundamentals helps you select the right materials and techniques for durable, professional results. Incorporating European-inspired design principles can further refine your projects, especially when combined with durable and sustainable materials. Recognizing the importance of joint strength ensures your creations remain durable over time. Employing proper cutting techniques also enhances the accuracy and clean appearance of your spline joints. Moreover, exploring expert tutorials can provide valuable insights to improve your craftsmanship and achieve flawless results.

Large Walnut Bow Tie Inlay Blanks 5-Pack | Butterfly Keys 4.5×1.25×0.75 | Wood Spline Joint | Dutchman Patch | Table Crack Fix | Slab Reinforcement
LARGE FORMAT WALNUT BLANKS – Oversized 4.5" x 1.25" x 0.75" bow tie inlays ideal for bigger slabs,…
As an affiliate, we earn on qualifying purchases.
As an affiliate, we earn on qualifying purchases.
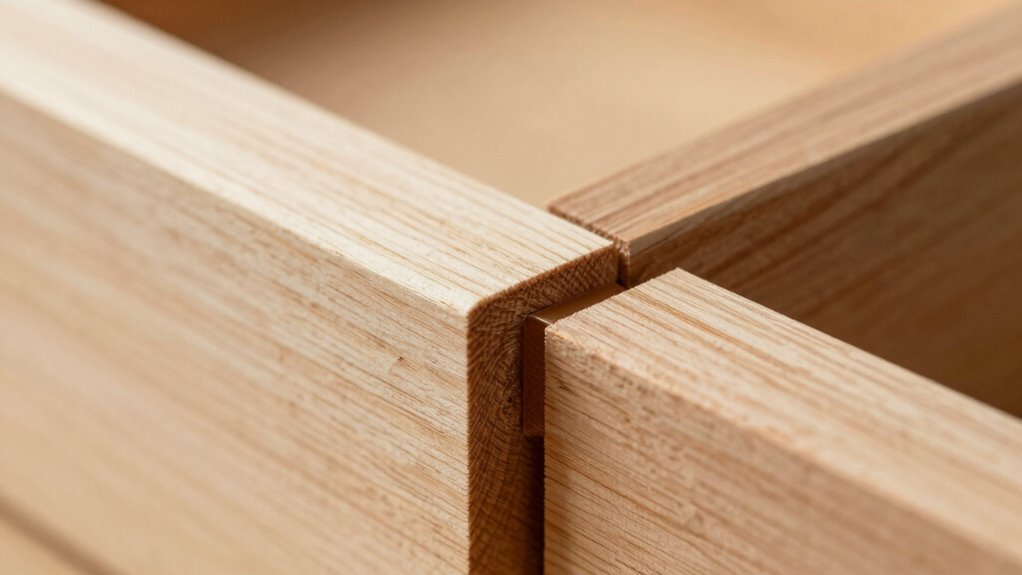
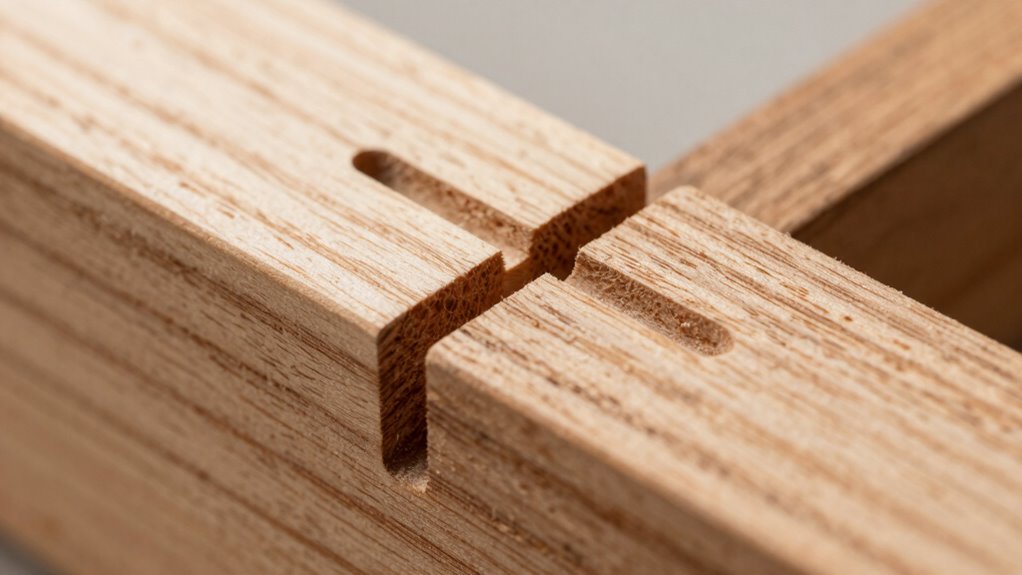
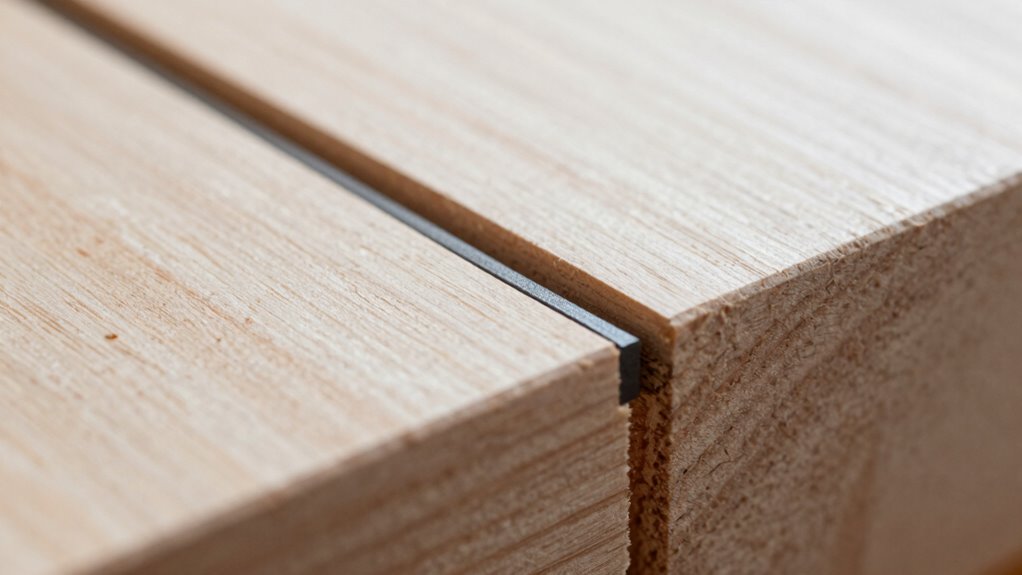
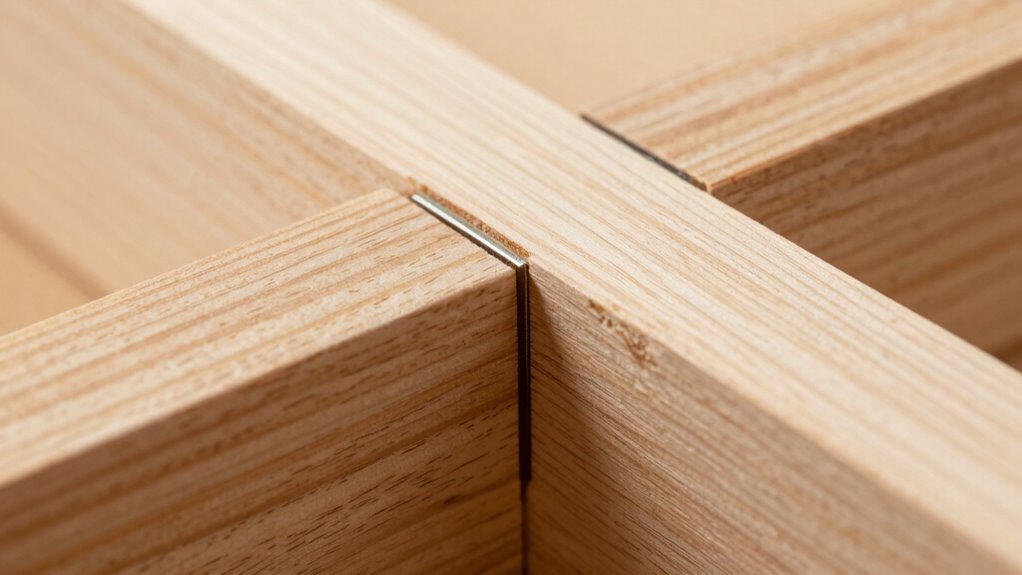
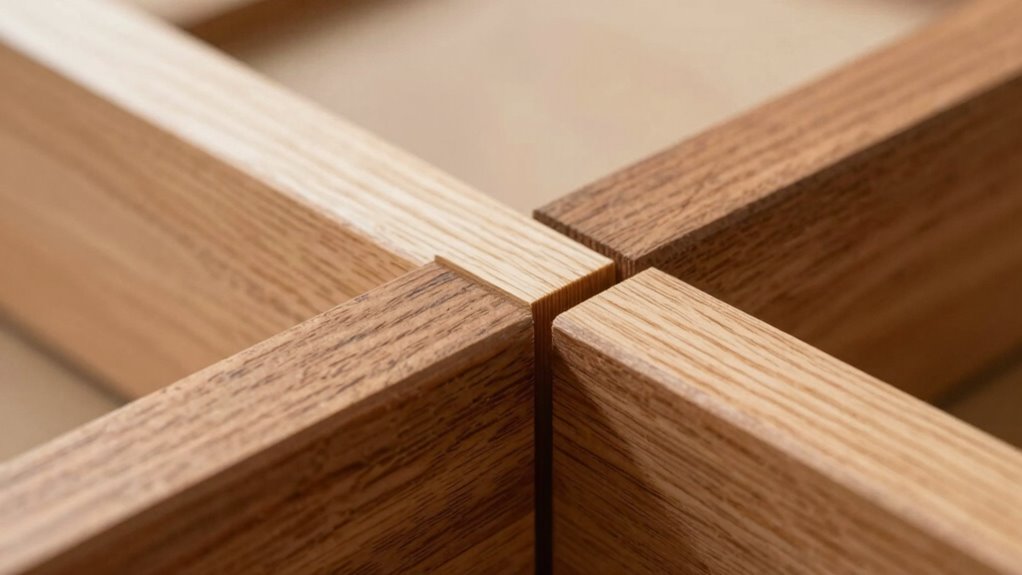
How Do Splines Strengthen and Align Miter Joints?

Splines reinforce and align miter joints by acting as internal dowels that fit snugly into precisely cut grooves. This joint reinforcement stops joint separation and maintains perfect alignment, especially under stress. The spline’s snug fit ensures the pieces stay aligned during assembly and drying, leading to cleaner, more professional results. Additionally, splines enhance woodworking aesthetics by adding a subtle design element that can be decorative or understated. They distribute stress evenly across the joint, increasing overall strength and durability. Properly installed splines make your miter joints more resistant to movement or warping over time. Understanding material properties helps in selecting the right spline material for different applications, ensuring optimal performance and longevity. Using precision cutting techniques is essential to ensure the spline fits tightly and functions effectively. Selecting the appropriate fire-resistant materials can also improve safety when working with heat or fire-related projects. A good understanding of your dogs’ names can also help in selecting appropriate tools and materials for DIY woodworking projects, especially when customizing pet furniture or accessories.

Feiyang Miter Spring Clamps Classic Kit for Woodworking
This kit consists of 16 clamps and one specialized pliers for effortlessly opening the clamp tips,designed for picture…
As an affiliate, we earn on qualifying purchases.
As an affiliate, we earn on qualifying purchases.
How to Choose the Best Spline Material for Your Project
Choosing the right spline material is essential for ensuring your miter joints are strong and durable. You should consider how the wood grain will match or complement the surrounding wood, as this affects both appearance and strength. A spline with a similar grain pattern blends seamlessly, making the joint less noticeable. Additionally, think about finish compatibility—some materials accept stain, paint, or varnish better than others. For example, hardwood splines like oak or maple typically accept finishes well and provide durability. Softwoods may be easier to work with but might not hold up as long. Match the spline material to your project’s purpose, ensuring it supports both aesthetic goals and structural integrity. Your choice impacts the joint’s longevity and visual harmony. Understanding material properties is crucial for selecting the best spline for your specific application. Being aware of material compatibility with different finishes can help you achieve a professional look and lasting results. Considering environmental factors can also influence the longevity of your spline, especially in areas exposed to moisture or temperature changes. Recognizing material stability over time can help you select a material that remains reliable in varying conditions. Paying attention to climate considerations can help you select a material that remains stable over time.

O'SKOOL Self-Centering Steel Spline Jig for Trim Routers – Woodworking Jig for Cutting Spline Joints on Large Furniture Corners, Boxes & Frames
Keep Your Spline Cuts Centered :Cutting spline joints freehand can easily drift off the centerline. The self-centering guide…
As an affiliate, we earn on qualifying purchases.
As an affiliate, we earn on qualifying purchases.
How to Install Splines in Miter Joints : A Step-by-Step Guide
Installing splines in miter joints might seem challenging at first, but following a clear step-by-step process makes it straightforward. First, cut the spline to fit snugly into the groove you’ve cut with a saw or router. Apply woodworking adhesives to the spline and the joint, ensuring a strong bond in finish carpentry projects. Next, insert the spline into the mitered slot, making sure it aligns perfectly. Clamp the joint securely until the adhesive cures. Once dry, sand the joint smooth for a seamless finish. Proper adhesive curing and joint stabilization techniques are essential for a durable, professional-looking result. Additionally, controlling the clamping pressure during curing helps prevent joint misalignment and ensures a tight fit. Finally, check for tightness and stability. To visualize the process:
Installing splines in miter joints is simple with proper steps: cut, glue, insert, clamp, and sand.
- Cut the spline to size
- Apply woodworking adhesives
- Insert into the miter groove
- Clamp until cured
- Sand for a smooth finish
Common Mistakes When Installing Splines and How to Avoid Them

One common mistake is cutting the spline too long or too short, which can compromise the fit and strength of the joint. Precise measurement guarantees a secure fit, preventing gaps or tight spots that hinder assembly. When trimming splines, avoid rushing; use a sharp saw and test fit frequently. Poor finishing techniques, like rough sanding or uneven surfaces, can also weaken the joint and diminish decorative accents. Smooth, well-finished splines create a seamless look and enhance the overall aesthetic. Also, neglecting to align the spline properly during installation can cause misalignments that affect both strength and appearance. To avoid these issues, take your time with measurements, focus on clean finishing, and double-check alignment before final assembly. Proper attention ensures your miter joints are both sturdy and visually appealing.
Comparing Splines to Other Miter Reinforcement Methods

Splines are a popular method for reinforcing miter joints because they provide a strong, seamless connection that enhances both durability and appearance. Compared to other reinforcement methods, splines offer a clean look, especially useful when adding decorative accents to furniture assembly. They distribute stress evenly and resist twisting, outperforming simple glue or nails. Additionally, the ease of installation makes splines a preferred choice for both novice and experienced woodworkers. They also allow for precision alignment, ensuring the joints stay perfectly positioned during assembly. While dowels or biscuits are quick, splines deliver a more refined, decorative touch. They’re ideal when you want reinforced joints that also elevate the visual quality of your project. Proper technique in creating and installing splines can significantly impact the strength and aesthetics of the joint.
Essential Tools and Techniques for Precise Spline Fitting
Choosing the right spline type is essential for achieving a precise fit in your project. You need techniques that guarantee accuracy and smoothness, especially when working with complex miters. By selecting appropriate tools and methods, you’ll improve the quality and reliability of your spline joints. Utilizing precision measurement tools can significantly enhance your ability to create seamless and well-fitting spline joints. Additionally, understanding spline fitting techniques can help you select the most suitable method for your specific application. Incorporating accurate measurement methods ensures that your spline fits remain consistent and reliable throughout the project. Paying attention to material compatibility can also prevent issues with fit and durability over time. Mastering proper calibration of your tools is also crucial to maintain precision during every step of the fitting process.
Choosing the Right Spline Type
Selecting the appropriate spline type is essential for achieving accurate and smooth fits in your projects. The right choice impacts not only the strength of your joint but also the ease of installation and finishing techniques. Consider the material compatibility, as different spline types suit various wood species and applications. For example, solid wood splines offer durability, while plywood or MDF can simplify work and reduce waste. Safety should always be a priority, so choose splines that are easy to handle and install securely. Additionally, think about the final look—some spline types lend themselves better to seamless finishes, while others may require more sanding or finishing work. Picking the correct spline type ensures your miters are both precise and safe to work with, enhancing your overall project quality.
- Material compatibility
- Joint strength
- Ease of installation
- Finish suitability
- Safety considerations
Techniques for Accurate Fitting
Achieving a perfect fit when installing splines in miter joints requires precise techniques and the right tools. Start by carefully selecting materials that match your project’s demands for joint reinforcement. Use sharp saw blades and fine rasps to ensure clean, accurate cuts. Properly align the spline before gluing to prevent gaps. Clamp the joint securely during drying to maintain tight contact.
| Technique | Purpose |
|---|---|
| Accurate Cutting | Ensures tight joint fit |
| Proper Alignment | Prevents gaps and misfits |
| Controlled Clamping | Maintains joint integrity during setting |
| Material Selection | Reinforces joint and matches wood |
Creative and Functional Uses of Splines in Woodworking Projects
Splines are a versatile tool in woodworking, offering both aesthetic appeal and structural strength to your projects. You can use them for joint reinforcement, ensuring your pieces stay durable over time, or as decorative accents that add visual interest. Creative applications include inlaying splines into tabletops for a contrasting look, using them to strengthen miter joints in picture frames, or adding them to cabinet doors for a stylish detail. You might also incorporate splines in chair rails or moldings to enhance stability and design. Additionally, splines can serve as a visual element, highlighting craftsmanship and craftsmanship details. Their flexibility makes them ideal for both functional projects and decorative touches, allowing you to elevate your woodworking with subtle yet impactful design elements.
Troubleshooting Tips for Perfect Spline Miter Joints
Getting your spline miter joints just right requires attention to detail. You need to make certain of precise alignment, choose the appropriate material, and use effective clamping and gluing techniques. Mastering these points will help you achieve strong, seamless joints every time.
Precise Spline Alignment Techniques
To guarantee a perfect spline miter joint, you need to focus on precise alignment techniques that minimize gaps and misfits. Proper alignment ensures joint stability and enhances the overall aesthetic. Start by marking the spline locations accurately, then use clamps to hold pieces securely during assembly. Double-check angles with a miter gauge or square before gluing. Using a jig or guide can help maintain consistent positioning and prevent shifting. Pay close attention to the fit of the spline; it should be snug without forcing. Regularly test fit and adjust as needed, ensuring each piece aligns perfectly. These techniques reduce misalignment, boost joint stability, and create a seamless, professional look.
- Use a precision miter gauge or jig
- Mark spline positions carefully
- Clamp pieces firmly during assembly
- Check angles before gluing
- Test fit frequently
Selecting the Right Spline Material
Have you ever struggled with splines that don’t fit or cause joint gaps? Choosing the right spline material is vital for a strong, seamless miter joint. Safety should be your top priority—use appropriate tools and protective gear when working with different woods. Consider the history of woodworking; traditional materials like hardwoods provide durability and stability, but softer woods like pine are easier to cut and shape. Match the spline material to your project’s needs, balancing strength and ease of use. For intricate or high-stress joints, hardwoods like oak or maple are ideal. For decorative or light-duty work, softer woods work well. Selecting the right material ensures safety, precision, and a professional finish, making your miter joints both durable and visually appealing.
Clamping and Gluing Strategies
Achieving perfect spline miter joints hinges on effective clamping and gluing techniques that guarantee alignment and strong adhesion. Proper strategies ensure joint stability and enhance the aesthetic appeal of your project. To do this, use consistent pressure across the joint to prevent gaps and misalignment. Always clean and apply glue evenly, avoiding excess that can seep out. Use clamps with padded jaws to protect the wood surface and maintain even pressure until the glue sets. Keep the joint stationary during curing to prevent shifting. Additionally, check alignment frequently and adjust clamps as needed.
- Use multiple clamps for even pressure
- Apply glue sparingly to avoid squeeze-out
- Protect surfaces with pads or scrap wood
- Keep clamps tight but not over-tightened
- Allow ample drying time for maximum joint strength
Frequently Asked Questions
Can Splines Be Used With Different Types of Wood?
Yes, splines can be used with different types of wood. You should consider wood compatibility to make certain the spline fits well and provides strong joints. Also, think about finish considerations, as some woods may stain or finish differently around the spline. By selecting the right spline material and preparing your wood properly, you’ll achieve both durability and a seamless appearance, regardless of the wood type you choose.
How Thin Can a Spline Be Before It Weakens the Joint?
A spline can be as thin as 1/8 inch before risking weakening the joint. Research shows that fiber strength diminishes considerably when splines are thinner than this, compromising joint durability. You should aim for a spline thickness that maintains structural integrity, typically between 1/8 to 1/4 inch, to guarantee ideal strength. Thinner splines may save space but can drastically reduce the joint’s overall fiber strength and durability.
Are There Specific Finishes Recommended for Spline-Inlaid Joints?
You should choose wood finishing options that enhance both durability and aesthetics for spline-inlaid joints. Clear finishes like polyurethane or lacquer protect the wood while showcasing the spline’s details, offering a seamless look. For a more natural aesthetic, consider oil or wax finishes that highlight the grain and warmth of the wood. Ultimately, select a finish that matches your project’s style and provides the necessary protection for the joint’s longevity.
How Do Splines Affect the Overall Appearance of the Project?
Splines enhance the overall appearance of your project by providing visual continuity along joints, making seams less noticeable. They add an aesthetic enhancement that can either subtly blend in or stand out, depending on your choice of material and finish. When used thoughtfully, splines give your work a polished look, emphasizing craftsmanship and detail, and transforming simple miters into visually appealing, cohesive elements.
Can Splines Be Removed Easily if Adjustments Are Needed Later?
Did you know that 85% of woodworkers find spline removal straightforward? You can remove splines easily if adjustments are needed later, thanks to their design. The removal process usually involves gently prying or sanding, which minimizes damage and allows for quick adjustments. This ease of removal makes splines a practical choice, giving you flexibility to refine your project without hassle or extensive work.
Conclusion
Think of splines as the secret ingredient that elevates your miter joints from good to great. With the right technique and materials, you can turn a fragile corner into a masterpiece of strength and precision. Don’t let common mistakes derail your project—embrace these tiny inserts and watch your woodworking skills flourish. After all, isn’t the true beauty of craftsmanship found in the details that hold everything together?