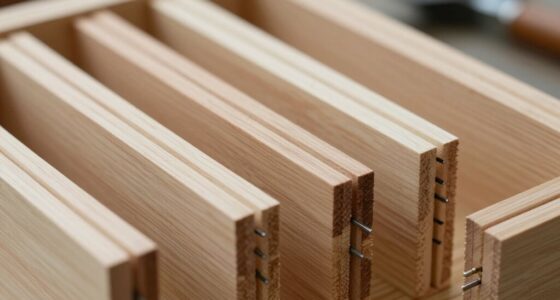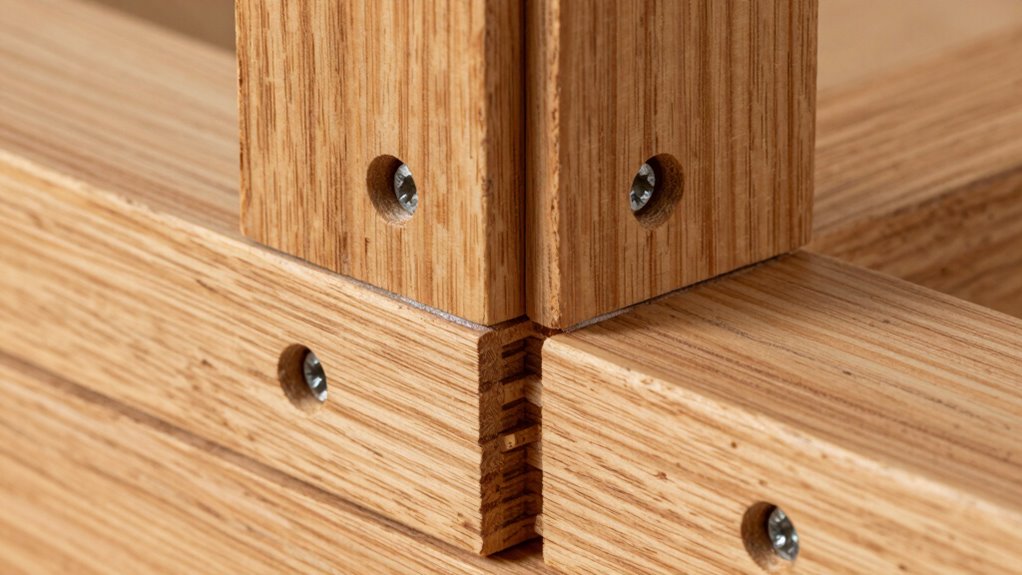

To guarantee your pocket holes are truly strong, focus on proper placement. Space them about 12 to 16 inches apart for even stress distribution, keeping them away from edges to prevent splitting. Align holes perpendicular to the grain and avoid placing them too close to the surface. Use clamps and consistent angles to prevent misalignment. Mastering these placement rules guarantees durable joints; keep going to uncover more tips for professional results.
Key Takeaways
- Space pocket holes 12 to 16 inches apart for even stress distribution and strong joints.
- Position holes 1.5 to 2 inches from edges to prevent splitting and ensure stability.
- Drill holes perpendicular to the grain to reduce the risk of wood splitting.
- Avoid placing holes too close to edges or unevenly to maintain joint integrity.
- Use consistent angles and proper screw length for tight, durable, and professional joints.

VEVOR Pocket Hole Jig Kit, 34 Pcs Pocket Hole Jig System with 11" C-clamp, Fixture, Step Drills, Wrenches, Drill Stop Rings, Square Drive Bits, Toolbox, Adjustable, for DIY Carpentry Projects
Stability and Power are Here: Are you looking for a durable pocket hole jig kit? Our kit features…
As an affiliate, we earn on qualifying purchases.
As an affiliate, we earn on qualifying purchases.
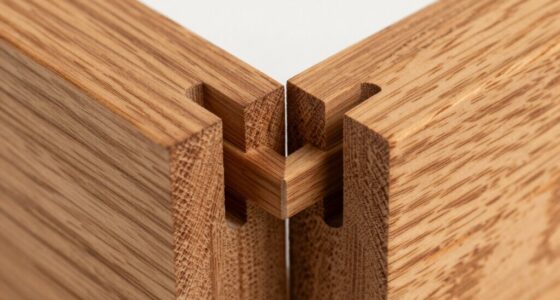
Why Proper Pocket Hole Placement Matters

Proper pocket hole placement is essential to guarantee your project’s strength and durability. When you position pocket holes correctly, you improve joint stability, ensuring the connection holds under stress. Proper placement also enhances the aesthetic appeal of your finished piece, making joints less visible and more seamless. If you drill holes too close to edges, you risk splitting the wood, weakening the joint. Conversely, placing holes too far from edges can reduce the strength of the connection. By following placement rules, you maintain both structural integrity and a clean look. Accurate pocket hole placement results in sturdy, long-lasting furniture or projects that look professional. Paying attention to these details makes a noticeable difference, providing you with reliable joints that stand the test of time. Understanding wood properties helps you choose the best placement for maximum strength and durability. Additionally, using the appropriate drill bit size ensures clean, precise holes that contribute to the overall strength of the joint. Proper technique during drilling also minimizes the risk of damaging your material. Recognizing how material density affects pocket hole placement is crucial for achieving optimal results in different types of wood. Being aware of industry standards can further guide you in making the most effective placement decisions for various projects.

LIONMAX Pocket Hole Screws 1-1/4 Inch, 600 PCS Interior Pocket Screw #8 x 1-1/4", Coarse Thread, Square Drive, Washer Head, Zinc Plated, 150MM Drive Bit Included
【For Pocket Hole】: Optimized pocket hole screws 1-1/4 inch length and washer head are designed for wood joinery…
As an affiliate, we earn on qualifying purchases.
As an affiliate, we earn on qualifying purchases.
How to Find the Best Spacing for Strong, Durable Joints

Finding the ideal spacing for pocket holes is essential to creating joints that are both strong and durable. Proper spacing guarantees effective joint reinforcement, preventing wood from splitting or loosening over time. Typically, placing pocket holes about 12 to 16 inches apart works well for most projects, but adjust based on the load and type of wood. Keep in mind aesthetic considerations—closer spacing can be less visible, but too many holes may weaken the joint. It’s important to balance strength and appearance, avoiding excessive holes that could compromise the material’s integrity. Consistent spacing also helps distribute stress evenly across the joint, increasing longevity. Additionally, understanding wood grain orientation can help determine optimal hole placement to maximize strength. Being mindful of fastening techniques can further improve the overall durability of the joint. For added stability, consider clamp application during assembly to ensure tight, aligned connections. By paying close attention to these factors, you’ll achieve sturdy, professional-quality results that last.

4 Inch Bar Clamps for Woodworking, 5 Pcs Trigger Quick Grip Clamps, One Handed Ratchet Wood Working Clamp, Mini Small Bar Woodworking Clamps for Wood Gluing Crafts (4Inch)
Superb Material: The durable material provides a construction that won’t buckle or bend under pressure and repeated use,…
As an affiliate, we earn on qualifying purchases.
As an affiliate, we earn on qualifying purchases.
Positioning Pocket Holes in Different Types of Wood
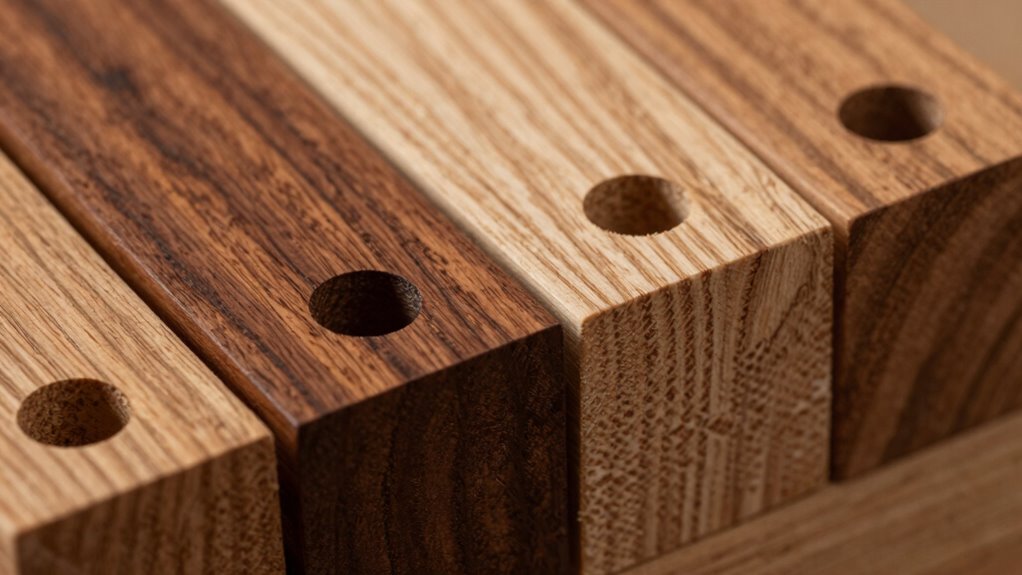
Different types of wood require different pocket hole placements to guarantee strong joints without weakening the material. First, pay attention to the grain direction; placing pocket holes perpendicular to the grain provides better strength and reduces splitting risks. For softer, low-density woods, keep pocket holes closer to the edges but avoid drilling too near the surface, which can cause splitting. Denser woods, like hardwoods, can handle pocket holes further from the edges, as their grain provides more stability. Always consider wood density, as high-density woods resist splitting but may require slightly different angles or spacing. Additionally, understanding wood properties can help you make better decisions about pocket hole placement for various projects, especially considering wood durability and how different woods respond to fasteners. Being aware of wood movement can further improve joint longevity by accounting for expansion and contraction over time. Proper positioning tailored to the wood type results in durable, reliable connections, and adjusting techniques based on seasonal changes can further enhance joint strength in different environments. Moreover, considering moisture content is essential, as it influences how wood reacts to environmental conditions and fastening techniques.

4 Pieces 3/8"(9.5mm) Drill Bit with Depth Stop Collar and 2 Pieces SQ2 Screwdriver bit Set, 1/4 Hex and Round Shank Replacement,for Manual Pocket Hole Guide Jig Master System (6.5 Inch Length)
4 Pieces 3/8"(9.5mm)Drill Bit with Depth Stop Collar and 2 Pieces SQ2 Screwdriver bit set, 1/4 Hex and…
As an affiliate, we earn on qualifying purchases.
As an affiliate, we earn on qualifying purchases.
Common Pocket Hole Placement Mistakes and How to Avoid Them
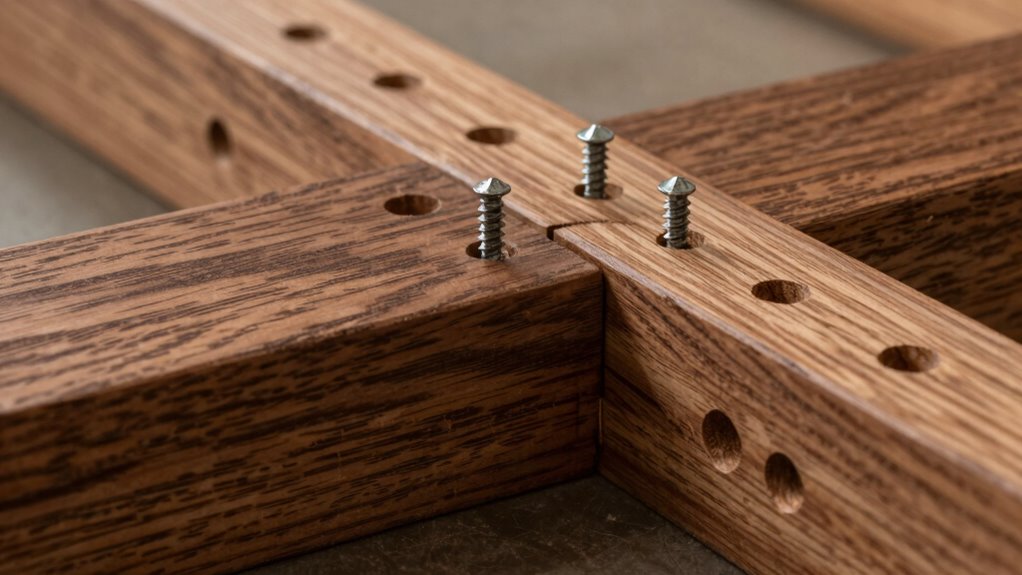
Even with a good understanding of proper pocket hole placement, mistakes can still happen if you’re not careful. Poor joint alignment is a common issue caused by placing holes too close to edges or unevenly. Incorrect screw selection can weaken the connection, leading to joint failure. To avoid these pitfalls: 1. Misplaced Pocket Holes: Place holes too far from edges or unevenly, compromising joint strength. 2. Poor Joint Alignment: Overlook the importance of lining up pocket holes on matching surfaces, causing gaps and instability. 3. Inadequate Screw Selection: Use screws that are too short or too long, risking weak bonds or damage to the wood. Proper load calculations and understanding safe installation practices are essential to ensure your projects are strong and durable. Pay attention to placement rules, choose the right screw length, and double-check joint alignment to make sure your projects are strong and durable.
Tips for Fine-Tuning Pocket Holes for Seamless Joints

To achieve seamless joints with pocket holes, it’s essential to fine-tune their placement and execution. Start by carefully aligning your pieces to ensure proper joint alignment before drilling. When pocket hole drilling, check that the drill angle is consistent; a slight deviation can throw off the joint’s appearance and strength. Adjust the depth of your drill bit to prevent over- or under-drilling, which can cause gaps or weak spots. Use clamps to hold pieces steady, maintaining perfect joint alignment during drilling. After drilling, test fit the pieces to verify tight, flush joints. Proper drilling technique and fine-tuning these details helps you achieve professional-looking, seamless joints that are both strong and visually appealing. Proper pocket hole drilling and precise alignment are key to flawless results, especially when considering high-quality joinery methods that enhance overall durability.
Frequently Asked Questions
Can Pocket Hole Placement Vary for Outdoor vs. Indoor Furniture?
Yes, pocket hole placement can vary for outdoor versus indoor furniture. You should consider finishing techniques and aesthetic considerations when deciding where to position the pocket holes. For outdoor pieces, place screws where they won’t be visible or exposed to weather, ensuring durability. Indoors, you can focus more on hidden joints for a cleaner look. Adjust your placement accordingly to balance strength, appearance, and longevity in each setting.
How Does Wood Grain Direction Influence Pocket Hole Positioning?
You might worry that grain direction complicates pocket hole placement, but it actually enhances joint stability when you follow proper positioning. Align your pocket holes perpendicular to the grain orientation to prevent splitting and ensure strong joints. Ignoring grain flow risks weakening the structure, so paying attention to grain direction helps you build furniture that’s both durable and visually appealing. Trust your instincts and follow these rules for the best results.
Are There Specific Pocket Hole Guidelines for Plywood Versus Solid Wood?
Yes, there are specific pocket hole guidelines for plywood versus solid wood. For plywood, you should space pocket holes farther apart to guarantee joint stability and prevent splitting, and use longer screws for better material compatibility. In solid wood, closer spacing enhances strength without risking damage. Always consider the material’s thickness and grain to optimize joint stability, ensuring your projects are durable and properly supported.
What’s the Ideal Pocket Hole Placement for Load-Bearing Furniture?
Think of your project as a well-oiled machine from the days of steam engines. For load-bearing furniture, you should place pocket holes about 1.5 to 2 inches from the edges and at least 1.5 inches from the ends to guarantee joint stability. Keep the holes aligned for even stress distribution, and consider aesthetic considerations by hiding them on less visible surfaces. Proper placement assures strength and a clean look.
How Do Temperature and Humidity Affect Pocket Hole Joint Strength?
Temperature and humidity cause wood expansion and contraction, which can weaken your pocket hole joints over time. When moisture effects increase, wood swells, putting stress on the fasteners and potentially loosening joints. To maintain strength, you should allow for seasonal wood movement by choosing ideal placement and avoiding tight joints in areas prone to high humidity or temperature fluctuations. Proper sealing and acclimating your wood also help guarantee lasting durability.
Conclusion
Mastering pocket hole placement is like planting seeds for a sturdy, beautiful garden—you reap strength and longevity. When you pay attention to proper spacing and positioning, you craft joints that stand tall through time’s storms. Avoid common pitfalls, and fine-tune each hole like a skilled artist shaping their masterpiece. With these secrets in your toolbox, your woodworking projects will not only hold firm but also tell a story of craftsmanship and care.