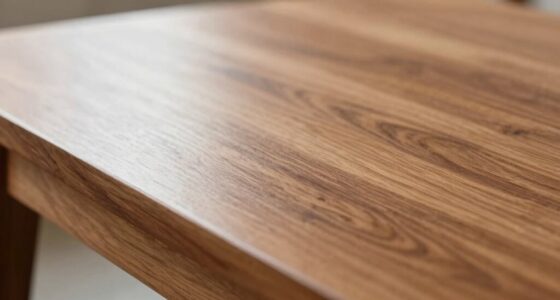

To prevent dark halos under finish on end grain, you need to focus on proper surface prep and sanding techniques. Start by removing all debris, splinters, and dust, then sand with the grain using progressively finer grits, typically from 220 to 320. Apply even pressure and avoid skipping grits. Sealing coats or primers help block uneven absorption, reducing halos. Mastering these steps ensures a flawless finish—keep going to learn more about perfecting your end grain work.
Key Takeaways
- Always sand with the grain, starting with medium grit and progressing to finer grits like 220–320 for a smooth finish.
- Remove surface debris, dust, and oils thoroughly before sanding to prevent uneven absorption and halos.
- Use consistent, gentle pressure and avoid skipping grits to achieve uniform surface porosity.
- Incorporate pattern techniques such as Free Floating to ensure even sanding across end grain.
- Seal or prime end grain before finishing to reduce porosity and prevent dark halos under the final coat.

50PCS Premium Sanding Sticks, Double End Matchsticks Sanding Twigs of 120/280 Grit, Fine Detailing Polishing Sticks for Plastic Models/Wood/Metal/Small Area/Hole Sanding, 5.4 x 0.2 Inch
【50PCS Sanding Sticks】Total 50 pcs premium sanding stick included, enough for your daily sanding for plastic models/wood/metal/nails. These…
As an affiliate, we earn on qualifying purchases.
As an affiliate, we earn on qualifying purchases.
How to Prevent Dark Halos When Finishing End Grain

To prevent dark halos when finishing end grain, controlling how the finish interacts with the porous surface is essential. Grain orientation plays a significant role; end grain absorbs finishes differently than face or edge grain, making it more prone to dark halos. Understanding the specific wood species helps you choose appropriate sealing methods. For example, some species have highly porous end grain, requiring a sealing coat or a pre-conditioner to minimize uneven absorption. Applying a thin, even coat of primer or sealer before the final finish helps create a barrier, preventing excess finish from penetrating unevenly. Always pay attention to grain orientation when sanding, and consider the wood species’ characteristics to achieve a smooth, halo-free finish on end grain.

Minwax 233334444 Polycrylic Protective Wood Finish, Clear Satin, ½ Pint
PROTECT WOOD SURFACES – Minwax Polycrylic Protective Finish protects and adds beauty to your interior wood projects, including…
As an affiliate, we earn on qualifying purchases.
As an affiliate, we earn on qualifying purchases.
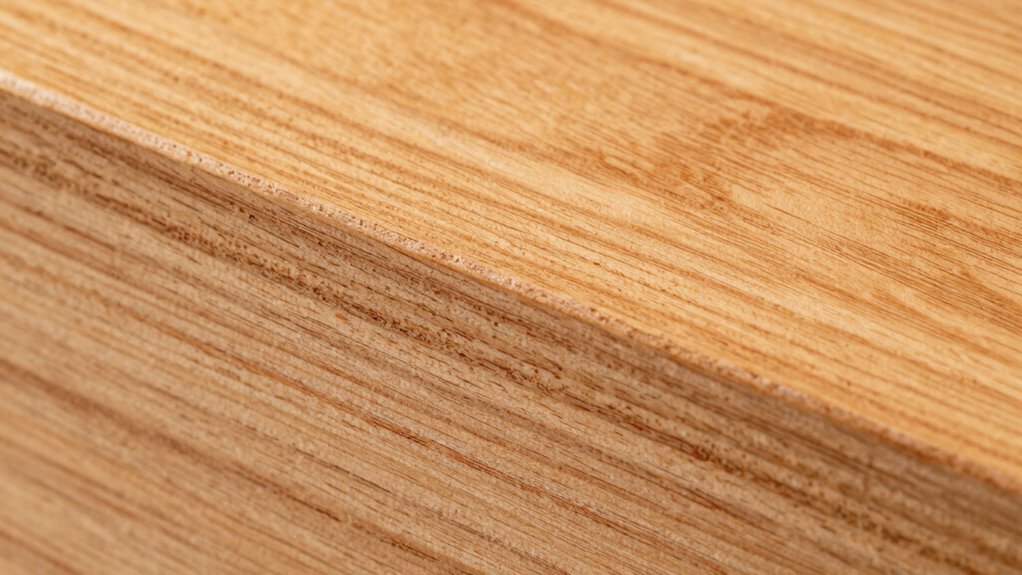
Why End Grain Causes Finish Problems and Dark Halos
Have you ever noticed dark spots or halos appearing around the edges of your finished end grain? That’s often caused by grain raising, which happens when moisture gets trapped in the wood fibers during finishing. End grain absorbs more moisture because it’s porous, causing the fibers to swell and stand up. When you don’t control moisture properly, the finish can seep unevenly into these raised fibers, resulting in dark halos. This phenomenon is closely related to the porosity of end grain, making it especially susceptible to moisture-related issues. Proper moisture control during sanding and finishing helps prevent grain raising. Using the right projector technology can also influence how finishes appear on different surfaces, emphasizing the importance of surface preparation. If you don’t address this, the finish won’t lay smoothly, and dark halos will be more prominent, ruining the overall look of your project. Additionally, paying attention to wood surface preparation is essential for achieving a smooth, professional finish. Being aware of wood grain characteristics can help you choose the best finishing approach for your project, reducing the risk of halos and uneven finishes. Understanding wood moisture content is also crucial, as it impacts how the wood reacts during finishing and can help you prevent issues before they start.

Aqua Coat Water-Based White Cabinet Wood Grain Filler Gel – Fast Drying, Low Odor White Wood Filler, Sandable & Paintable for Interior & Exterior Repairs, Upgrades & Restorations – 16 oz
SPECIALLY FORMULATED FOR DEEPER PENETRATION – Our small particle size gel formula penetrates and seals the pores minimizing…
As an affiliate, we earn on qualifying purchases.
As an affiliate, we earn on qualifying purchases.
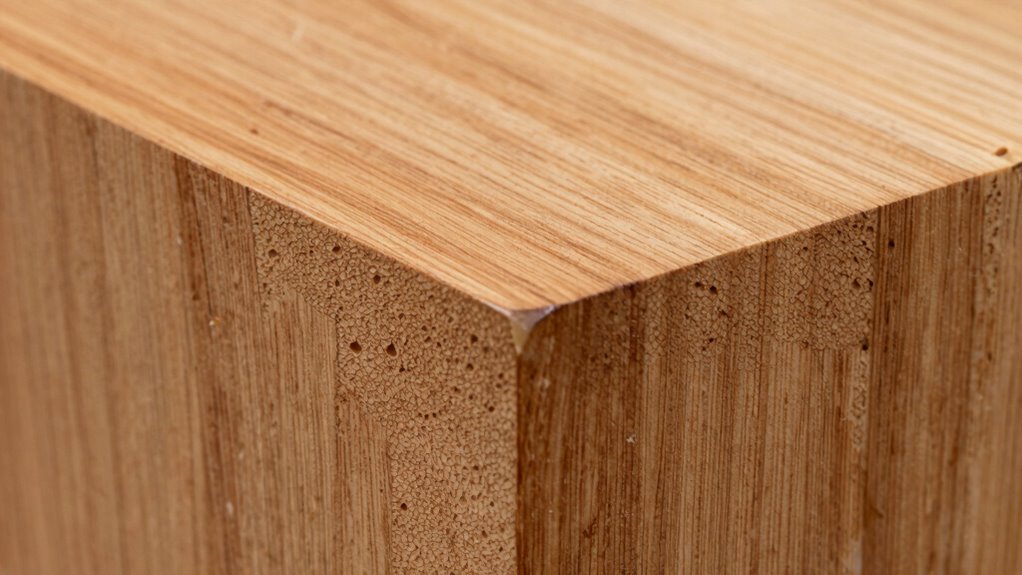
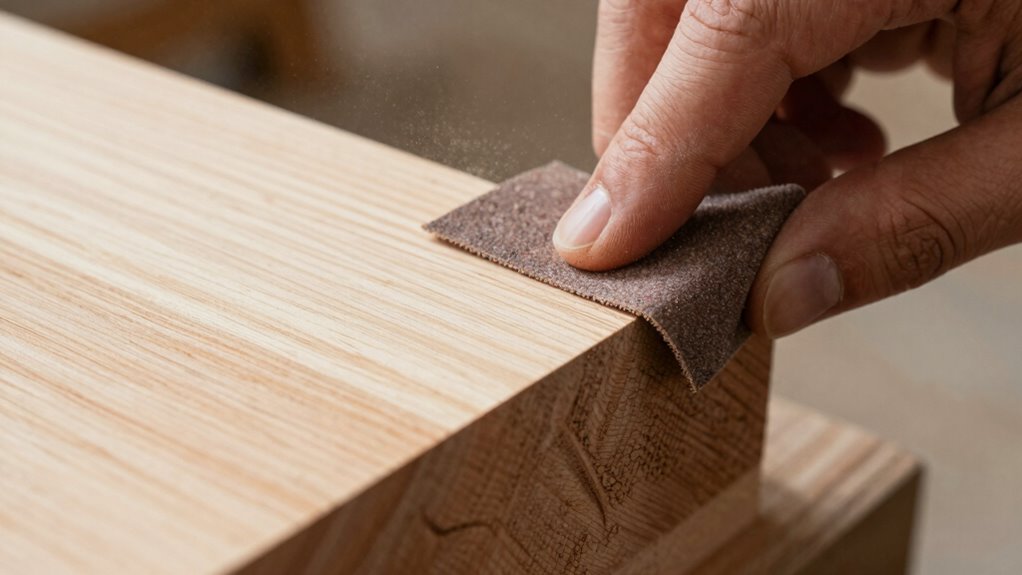
Choosing the Best Grit and Sanding Techniques for End Grain
To achieve a smooth finish on end grain, you need to select the right grit progression and sanding techniques. Using the correct grit sequence helps prevent dark halos and reveals a clean, even surface. Precision in your sanding approach guarantees the best results and minimizes finish problems. Additionally, understanding the wood movement characteristics of your project can help you choose the appropriate sanding and finishing methods to ensure long-lasting results. Incorporating the proper sanding sequence can significantly improve your overall finish quality and durability. For example, selecting the right sanding tools designed for delicate surfaces can further enhance your results and prevent damage to the wood. Regularly assessing your progress with visual and auditory cues can also help refine your technique and achieve a superior finish. Being mindful of grain direction during sanding can also reduce the risk of halos and create a more consistent surface.
Optimal Grit Progression
Choosing the right grit progression is essential for achieving a smooth, polished end grain surface. Start with a coarse grit to remove roughness, then gradually move to finer grits. Pay attention to grain orientation; sanding with the grain reduces scratches and helps prevent dark halos. As you progress, keep your sanding speed steady—slower speeds give you more control and prevent heat buildup, which can cause uneven surfaces. Avoid skipping grits, as this can leave scratches that show through the finish. Consistent, incremental grit changes ensure a uniform surface that’s ready for finishing. Remember, patience in this process results in a professional-looking, halo-free end grain that’s smooth and receptive to stain or finish.
Sanding Techniques Precision
Selecting the appropriate grit and applying precise sanding techniques are essential for achieving a flawless end grain surface. Focus on grain orientation—sand with the grain to prevent scratches that can lead to dark halos under finish. Use quality sanding tools, such as fine-grit pads and blocks, to maintain control and consistency. Proper technique ensures that you do not inadvertently cause damage that could compromise the final appearance. Additionally, understanding grain structure helps in choosing the right sanding approach for optimal results. Here, recognizing the wood’s natural grain pattern can guide your sanding process and prevent issues like halos. Here are key techniques to ensure precision:
- Start with a medium grit to smooth out rough surfaces without damaging the grain.
- Progress to finer grits, always following the grain orientation for a seamless finish.
- Use light, even pressure to avoid gouging or uneven sanding, ensuring the surface remains smooth and uniform.
Mastering these steps will help you produce a professional, halo-free end grain finish.
Preventing Dark Halos
Preventing dark halos around end grain requires careful attention to grit selection and sanding technique. To avoid uneven stain absorption, follow the correct grain orientation and use appropriate sanding tools. Start with a medium grit, then progress gradually to finer grits for a smooth finish. Always sand with the grain to prevent scratches that can trap stain or finish. Additionally, using Free Floating sanding techniques can help achieve consistent results across the surface. Proper technique and grit progression are essential for flawless end grain finishing. Incorporating sanding patterns can further enhance uniformity and prevent visible halos. Being aware of common causes of failure such as improper sanding methods can help maintain the integrity of your finish over time.

Romeda 8-Pack Sanding Sponge, Four Grits Per Pack 60/80/120/220, Washable and Reusable Handmade Sandpaper Block, Drywall Sandpaper Blocks for Wooden Drywall Sheetrock and Metal Glazing
【ASSORTED GRIT SANDING BLOCKS】 8 sand blocks, 4 sizes from coarse to ultra-fine sand, 60/80/120/220 grit, 2 blocks…
As an affiliate, we earn on qualifying purchases.
As an affiliate, we earn on qualifying purchases.
Step-by-Step: Sanding End Grain for a Smooth Finish
Start by preparing the surface properly, removing any debris or rough spots. Then, use fine grit sandpaper to make certain a smooth finish without creating scratches. Always sand with the grain to prevent damaging the end grain and achieve the best results. Additionally, consider the grain direction to ensure even sanding and avoid unwanted marks.
Prepare the Surface Properly
Before you begin sanding, make sure to prepare the surface properly to guarantee a smooth and even finish. Proper surface preparation involves understanding the grain orientation and addressing it accordingly. First, inspect the end grain closely to identify the direction of the wood fibers. Second, remove any rough spots, splinters, or debris that could interfere with your sanding. Third, ensure the surface is clean and free of dust, oil, or old finish, which can cause uneven absorption and halos. When you understand the grain orientation, you’ll know how to sand effectively without creating dark spots or halos. Proper surface preparation lays the foundation for a flawless finish, making your sanding process smoother and more predictable.
Use Fine Grit Sandpaper
Once you’ve prepared the surface properly, it’s time to switch to fine grit sandpaper, typically ranging from 220 to 320 grit. Using this finer grit helps guarantee better grain adhesion, allowing your finish to bond more effectively. It also smooths out any remaining roughness, reducing the risk of uneven absorption that can cause dark halos. Be gentle and consistent, sanding with the grain to avoid scratches or gouges. This step enhances the overall finish durability by producing a clean, smooth surface that resists chipping or peeling over time. Proper sanding technique ensures the best possible surface for your final finish. Taking the time to prepare the surface properly can significantly improve your results and reduce the need for touch-ups later. Additionally, maintaining a steady hand and consistent sanding pressure helps prevent creating uneven patches that might show through the stain or varnish. Finishing with fine grit sets the stage for a flawless, long-lasting final coat.
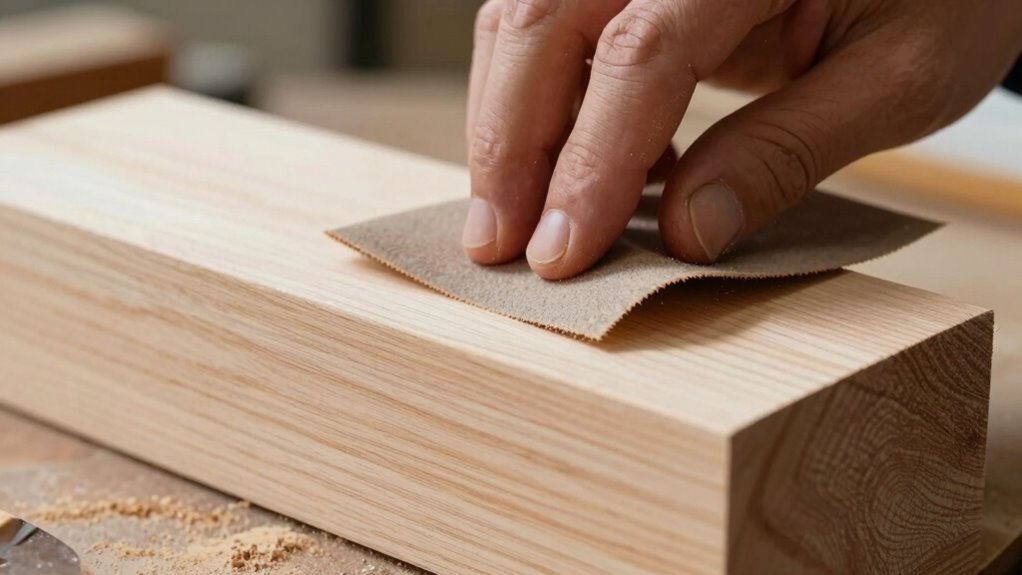
Sand With the Grain
After selecting the right fine grit sandpaper, it’s important to sand with the grain of the wood to achieve a smooth, even surface. Proper grain orientation guarantees you follow the natural lines, reducing scratches and preventing uneven spots. Apply gentle sanding pressure—pressing too hard can create dips or gouges, while too light may be ineffective. Focus on maintaining consistent pressure and following the grain’s direction throughout the process. Being aware of wood grain orientation is crucial for avoiding common sanding mistakes and achieving professional results. Here are three key tips:
- Always move your sander or sandpaper along the grain to avoid cross-grain scratches.
- Use light to moderate pressure, letting the sandpaper do the work.
- Regularly check your progress to ensure you’re following the grain properly and maintaining a smooth surface. Additionally, understanding sanding techniques can help you refine your skills and prevent damage to your woodwork.
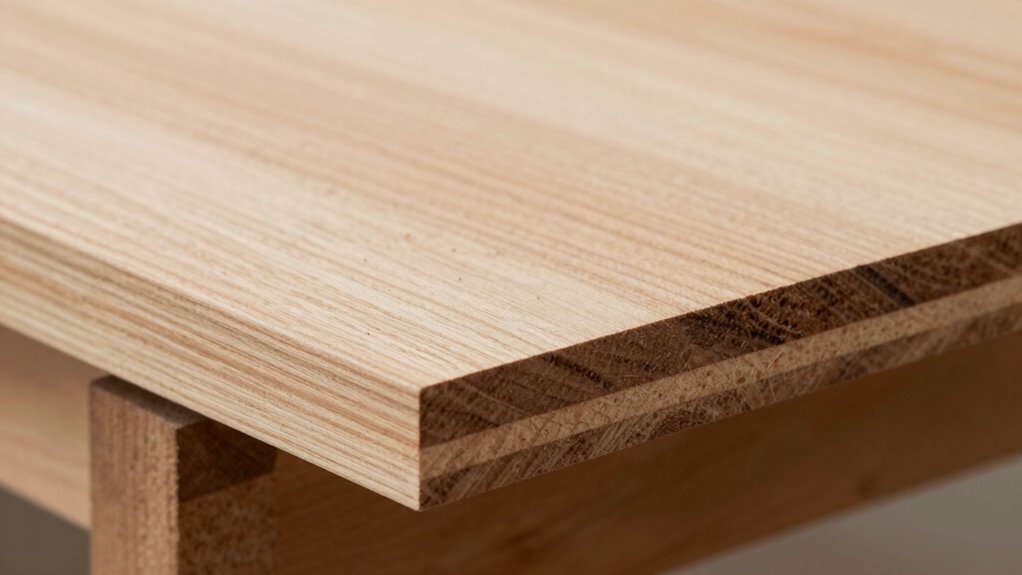
Applying Finish After Proper End Grain Sanding

Applying finish after proper end grain sanding is essential to achieving a smooth, durable surface that highlights your woodworking project. The key is to use effective sanding techniques to prepare the surface thoroughly, ensuring the end grain is even and free of rough spots. When you’re ready to apply finish, start with a high-quality product suited for end grain, such as a thin penetrating oil or sealant. Use a clean brush or cloth to apply the finish evenly, working along the grain and avoiding heavy coats. Proper finish application helps prevent blotching and dark halos, ensuring the end grain absorbs the finish uniformly. Take your time, and don’t rush the process—careful application enhances both the appearance and longevity of your finished piece. Consistent storytelling in your approach can also reinforce the quality and professionalism of your craftsmanship.
Troubleshooting Common End Grain Sanding and Finishing Issues
Even with careful sanding and finishing, issues can still arise on end grain that compromise the look and durability of your project. Grain porosity varies, making some areas absorb stain unevenly, leading to blotches or dark halos. You might also face finish adhesion problems, causing flaking or peeling over time. To troubleshoot effectively: 1. Uneven staining or dark halos – often caused by inconsistent grain porosity, which requires thorough sanding and even application of sealer. 2. Poor finish adhesion – due to residual dust or oils, so always clean the surface meticulously before finishing. 3. Rough or fuzzy end grain edges – indicating insufficient sanding or improper grain direction, which affects both appearance and durability. Additionally, understanding the sound healing science behind vibration can help you choose the right finishing techniques for optimal results. Addressing these issues ensures a smooth, professional finish that highlights the beauty of your end grain.
Tips for Consistent End Grain Sanding Results

Consistent end grain sanding results hinge on technique and attention to detail. First, always pay attention to grain orientation—sanding with the grain helps prevent scratches and uneven finishes. Use the right sanding tools, such as fine-grit sandpaper or sanding blocks, to maintain control and achieve a smooth surface. Keep your tools flat and steady, applying even pressure to avoid gouging or creating dips. It’s vital to frequently check your progress and adjust your technique accordingly. For best results, sand in gradual stages, moving from coarser to finer grits, and consistently follow the grain direction to ensure a uniform, professional finish. With careful attention to grain orientation and proper tools, you’ll consistently produce end grain that’s ready for a flawless finish.
Frequently Asked Questions
Can Different Wood Species Affect the Sanding Process for End Grain?
Yes, different wood species affect your sanding process because of variations in wood density. Harder woods require coarser sanding grit initially to remove imperfections, while softer woods need finer grit to prevent gouging. Adjust your approach based on the species, and always test on a small area first. This way, you’ll achieve a smooth end grain finish without dark halos or uneven coloration.
What Tools Are Best Suited for Sanding Intricate or Detailed End Grain Areas?
You should use delicate tools like small detail sanders, craft files, or fine-grit sanding sticks for detailed sanding of intricate end grain areas. These tools give you precise control, allowing you to carefully remove rough spots without damaging delicate edges. For tight corners or intricate patterns, consider using small, flexible abrasives or foam-backed pads that conform to the shape, ensuring smooth, even results without creating halos or uneven surfaces.
How Does Climate or Humidity Impact End Grain Finishing Outcomes?
Did you know that seasonal changes can cause moisture content in wood to fluctuate by up to 15%? This markedly impacts your end grain finishing, as high humidity can cause end grain to absorb more moisture, leading to uneven staining or halos. Conversely, in dry conditions, the wood shrinks, risking cracks. Always acclimate your wood and adjust your finishing process to seasonal humidity shifts for a smooth, professional finish.
Is It Necessary to Seal End Grain Before Applying Finish?
Yes, sealing end grain before finishing is essential. Proper sealing techniques, like applying a pore filler or a seal coat, help prevent moisture absorption, which can cause finish adhesion issues. Sealing guarantees a smooth, even surface and reduces the risk of dark halos or blotching. You should always seal end grain to achieve a professional, durable finish and maintain the wood’s natural beauty.
How Long Should I Wait Between Sanding and Applying the Finish?
Think of it like brewing a perfect cup of coffee—you need patience. You should wait at least as long as the finish’s curing time after sanding preparation before applying your finish. Usually, this means waiting 24 hours, but check your product’s instructions. Rushing this step risks uneven absorption or dark halos. Giving it proper time makes certain your project looks smooth and professional, just like that perfect brew.
Conclusion
By mastering the right sanding techniques for end grain, you can achieve a flawless finish free of dark halos. Remember, taking your time and using the proper grit makes all the difference. Do you want your projects to look professional and polished? With patience and the right approach, you’ll consistently get stunning results that showcase your craftsmanship. So, why settle for less when perfect end grain results are within your reach?