Getting started with your new Milwaukee power tools can seem daunting, but with the right setup process, you’ll be ready to tackle any project efficiently and safely. This guide walks you through the essential steps to assemble, power, and maintain your Milwaukee M18 cordless tools, ensuring optimal performance and safety on the jobsite or at home.

Get business pricing on tools and workshop supplies
- Business-only prices and quantity discounts
- Tax-exempt purchasing
- Multiple users, one account, clear invoices
From charging batteries to organizing your tools for easy access, follow these practical steps to maximize your investment and keep your workspace safe and productive.
Key Takeaways
| Power Setup | Ensure batteries are fully charged before use. |
| Safety First | Always wear safety gear and follow instructions. |
| Tool Assembly | Properly attach accessories for safe operation. |
| Maintenance | Keep tools clean and store batteries properly. |
| Troubleshooting | Identify common issues and solutions quickly. |
Unboxing and Initial Inspection
- Carefully unpack all components from the box, including the hammer drill, impact driver, circular saw, angle grinder, reciprocating saw, multi-tool, work light, batteries, charger, and tool bags.
- Inspect each item for any shipping damage or missing parts. Refer to the included manual for detailed component lists.
- Make sure you have the correct batteries (two high-capacity 5.0 Ah or 6.0 Ah, and one compact) and that the charger is functional.
Charging Your Batteries
Before using your tools, charge all batteries fully to ensure maximum runtime and performance. Connect the batteries to the included rapid charger, following these steps:
- Insert the battery into the charger, aligning the contacts properly.
- Plug the charger into a grounded outlet.
- Wait for the indicator lights to show the battery is fully charged—usually, a green light indicates readiness.
- Remove the batteries carefully and store any unused batteries in a cool, dry place.
Remember, keeping batteries charged and stored correctly prolongs their lifespan and ensures peak tool performance.
Assembling and Using Your Tools
Most Milwaukee cordless tools are designed for quick and easy assembly. Follow these general steps:
- Attach any necessary accessories, such as drill bits, blades, or grinding wheels, ensuring they are securely tightened.
- For tools like the impact driver or hammer drill, select the appropriate bit or driver and insert it into the chuck, tightening as needed.
- Test each tool briefly to confirm proper operation before starting your project.
Always wear safety glasses, gloves, and hearing protection when operating power tools. Make sure your workspace is clear of obstructions and that you have a stable footing.
Organizing and Maintaining Your Milwaukee Tools
Proper storage and maintenance extend the life of your tools and keep your workspace safe and organized:
- Store tools in the included heavy-duty contractor bags or the provided tool bags to prevent damage and facilitate transport.
- Clean your tools with a dry cloth after use; avoid using water or harsh chemicals.
- Check batteries regularly for any signs of damage or corrosion. Keep contacts clean and dry.
- Follow manufacturer instructions for periodic lubrication or maintenance, if applicable.
Troubleshooting Common Issues
If your Milwaukee tools are not performing as expected, consider these troubleshooting tips:
- Tool not turning on: Check that the battery is fully charged and properly seated. Inspect for any visible damage.
- Reduced runtime: Ensure batteries are charged, and clean contacts if needed. Consider upgrading to higher capacity batteries like the 5.0 Ah or 6.0 Ah models.
- Accessory slipping or not fitting: Confirm you are using the correct size and type of accessories for the specific tool.
The Products in This Guide
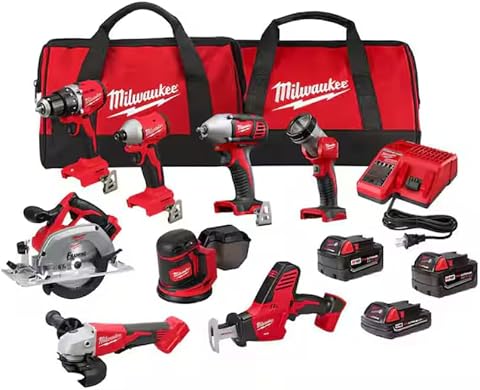
Milwaukee M18 18V Cordless Power Tool Combo Kit
- ✔ Battery System: M18 lithium-ion
- ✔ Number of Tools: 8
- ✔ Included Batteries: 3 (2 high-capacity, 1 compact)
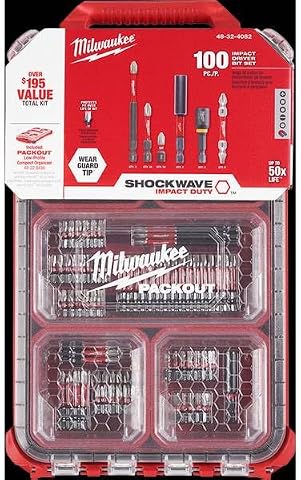
Milwaukee Shockwave 100pcs Impact Driver Bit Set Packout
- ✔ Number of Bits: 100
- ✔ Storage Case: Packout
- ✔ Material: Impact steel
Milwaukee M18 18V Cordless Power Tool Combo Kit
The Milwaukee M18 18V Cordless Power Tool Combo Kit is a comprehensive solution for a wide range of construction, remodeling, and maintenance tasks. It includes eight tools, three batteries, and two tool bags, making it ideal for professionals and DIY enthusiasts alike.
Pros:
- Complete 8-tool set
- Includes high-capacity batteries
- Portable storage in tool bags
- Rapid charger for minimal downtime
Cons:
- Heavy for extended use
- Requires careful organization
- Battery management needed
Best for: Construction, remodeling, maintenance projects requiring versatile power tools.
Not ideal for: Light-duty or occasional users who do not need such a comprehensive set.
Bottom line: A versatile, reliable kit that covers most needs for professional and DIY projects.
Milwaukee Shockwave 100pcs Impact Driver Bit Set Packout
Complement your Milwaukee power tools with the Shockwave Impact Driver Bit Set. This 100-piece set includes a variety of bits and a durable Packout case, perfect for professional jobs and DIY projects.
Pros:
- Wide variety of bits
- Durable Packout case
- Impact-rated for tough jobs
- Compatible with Milwaukee impact drivers
Cons:
- Bits may wear out with heavy use
- Case size may be bulky for some storage needs
- Requires impact driver for optimal use
Best for: Driving screws, bolts, and fasteners in tough materials.
Not ideal for: Light-duty screwdriving or casual users.
Bottom line: A comprehensive set that ensures you’re ready for any fastening challenge.
Frequently Asked Questions
How do I ensure my batteries are fully charged and ready?
Insert the batteries into the rapid charger and wait for the indicator lights to turn green, signaling a full charge. Store batteries properly for longevity.
Can I use other batteries with my Milwaukee tools?
It’s best to use Milwaukee M18 batteries, especially those designed with REDLINK and REDLITHIUM technology, to ensure compatibility and safety.
What safety precautions should I follow when setting up and operating the tools?
Always wear safety glasses, gloves, and hearing protection. Make sure your workspace is clear, and never operate damaged tools or batteries.
How do I troubleshoot if my tool doesn’t turn on?
Check that the battery is fully charged and properly seated. Inspect for any visible damage. Replace the battery if necessary.
How should I store my Milwaukee power tools and batteries?
Store tools in their provided bags or a dry, organized space. Keep batteries in a cool, dry place, away from extreme temperatures and children.
Master Your Milwaukee Setup for Peak Performance
Setting up your Milwaukee power tools properly is key to safe operation and long-term durability. By following these steps—unboxing carefully, charging batteries fully, assembling tools correctly, and maintaining organization—you’ll ensure your tools perform reliably for years to come. Always prioritize safety and proper maintenance to get the most out of your investment and tackle your projects with confidence.
Affiliate disclosure: As an Amazon Associate we earn from qualifying purchases. Prices and availability are accurate as of the time of publishing.
Fall Picks
fall essentials
As an affiliate, we earn on qualifying purchases.