To create strong, durable pocket hole joints without regret, focus on precise placement and proper angles. Use accurate measuring tools, clamps, and guides to guarantee holes are evenly spaced and aligned correctly. Adjust your screw length and angles based on your material and project needs, usually between 15° and 20°. Avoid common mistakes like over-tightening or misplacing holes. Keep these best practices in mind, and you’ll discover more secrets to flawless pocket hole craftsmanship.
Key Takeaways
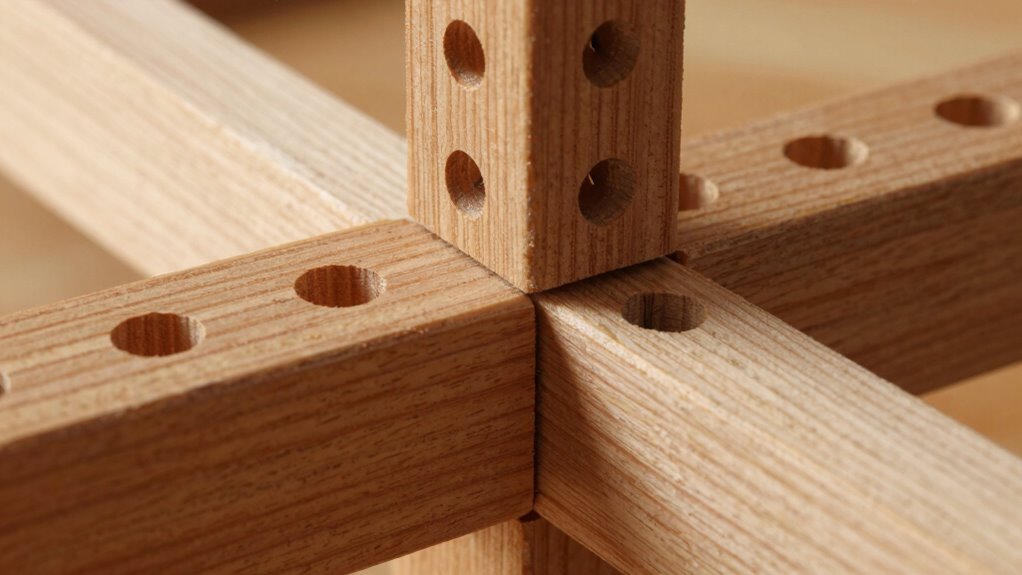
- Properly position pocket holes 2–3 inches apart and away from edges to prevent splitting and ensure even load distribution.
- Use precise marking tools and jigs to ensure consistent, accurate placement for maximum joint strength.
- Set drill angles between 15°–20° based on material and joint type to optimize strength and flexibility.
- Select screw length appropriate for material thickness, avoiding over-tightening to maintain joint integrity.
- Reinforce weak joints with additional screws or glue, and always verify alignment before assembly.

VEVOR Pocket Hole Jig Kit, 34 Pcs Pocket Hole Jig System with 11" C-clamp, Fixture, Step Drills, Wrenches, Drill Stop Rings, Square Drive Bits, Toolbox, Adjustable, for DIY Carpentry Projects
Stability and Power are Here: Are you looking for a durable pocket hole jig kit? Our kit features…
As an affiliate, we earn on qualifying purchases.
As an affiliate, we earn on qualifying purchases.
Why Proper Pocket Hole Placement Is Key to Strong Joints

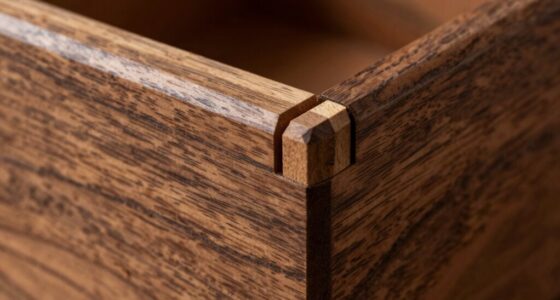
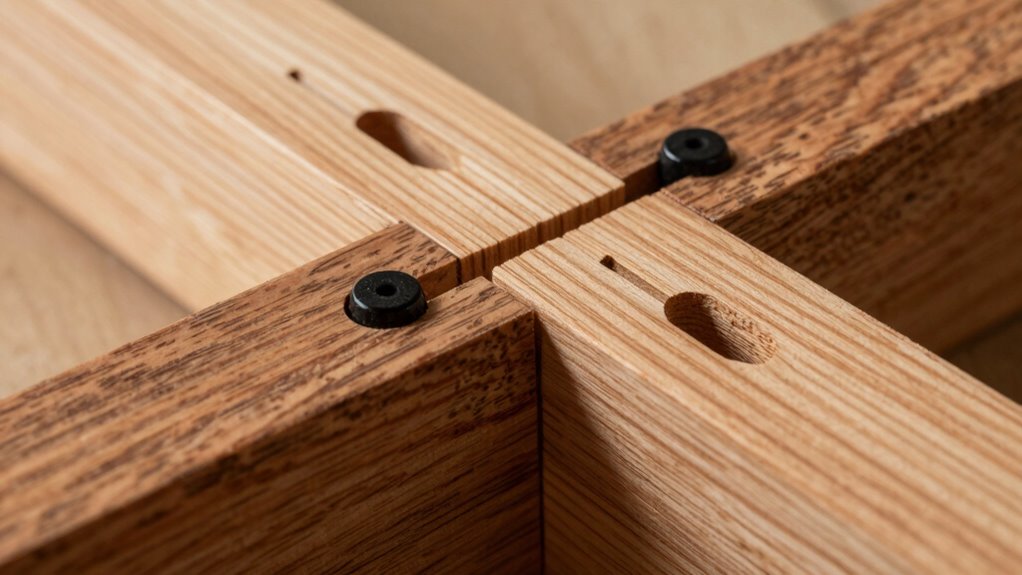
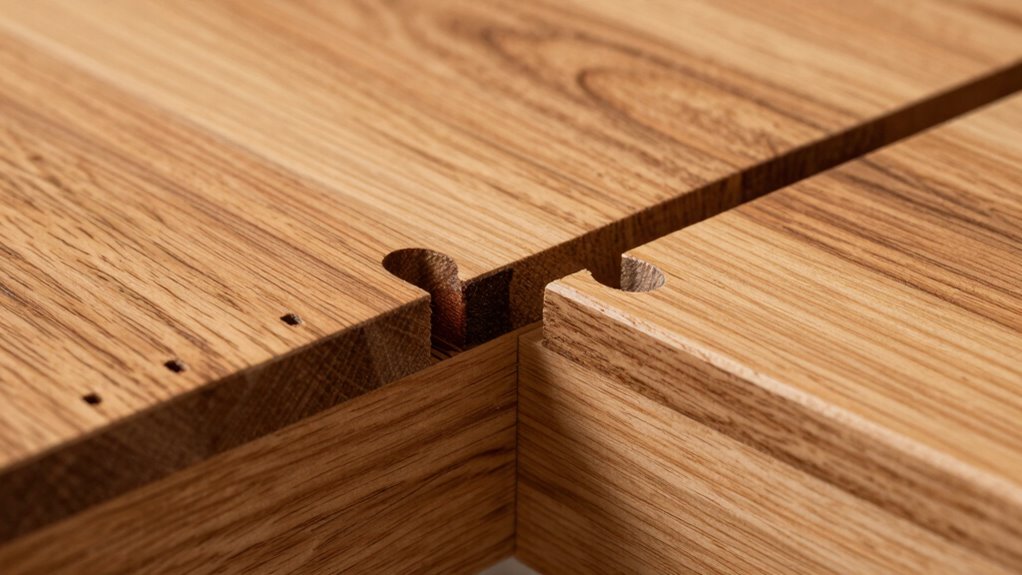
Proper pocket hole placement is vital because it directly affects the strength and durability of your joints. When positioning your pocket holes, consider using the right screw length to guarantee a secure connection without risking splitting or weak points. Applying wood glue before screwing adds extra stability, but only if the pocket holes are correctly aligned. Misplaced holes can cause uneven stress, leading to loose joints or potential failure over time. Accurate placement ensures that the screws pull the pieces tightly together, maximizing the bond between the wood surfaces. Remember, the goal is to create a joint that withstands weight and movement, so taking care during placement is essential for long-lasting, strong furniture or projects. Proper technique now saves you time and frustration later. Additionally, understanding clamping techniques can help keep your pieces aligned during assembly, ensuring optimal joint strength. Incorporating wood movement considerations into your planning can further enhance the longevity of your joints, especially in varying humidity conditions. Being aware of wood grain direction can also influence how well your pocket holes hold under stress, leading to more reliable results. Paying attention to joint angles can help distribute stress evenly and improve overall joint integrity. Moreover, being mindful of stress distribution can prevent localized weaknesses, ensuring a more durable connection in your projects.

HORUSDY 8-Pack Bar Clamps for Woodworking, 12" and 6" Bar Clamps, Wood Working Clamp Sets, Quick Clamps F Clamp with 150 LBS Load Limit (8-Pack Wood Clamps)
1. The complete set includes 4pcs 6" bar clamps,2pcs 12" bar clamps and 2pcs 6" spring clamps, which…
As an affiliate, we earn on qualifying purchases.
As an affiliate, we earn on qualifying purchases.
How to Use Tools and Techniques for Accurate Pocket Hole Positioning
To guarantee your pocket holes are precisely placed, start with accurate marking techniques that guide your drill. Next, align your tools properly to keep everything straight and consistent. Incorporating simple systems into your setup can further enhance your accuracy and confidence during the process. Using proper measurement tools can also help ensure your pocket hole placement is consistent and reliable. Additionally, understanding luggage & bags considerations can help you transport your tools safely and efficiently to your workspace. Moreover, being aware of cloud service reliance can prepare you for unexpected disruptions, ensuring your workflow remains steady. Implementing measurement accuracy practices can significantly reduce errors and improve the overall quality of your woodworking project.
Accurate Marking Techniques
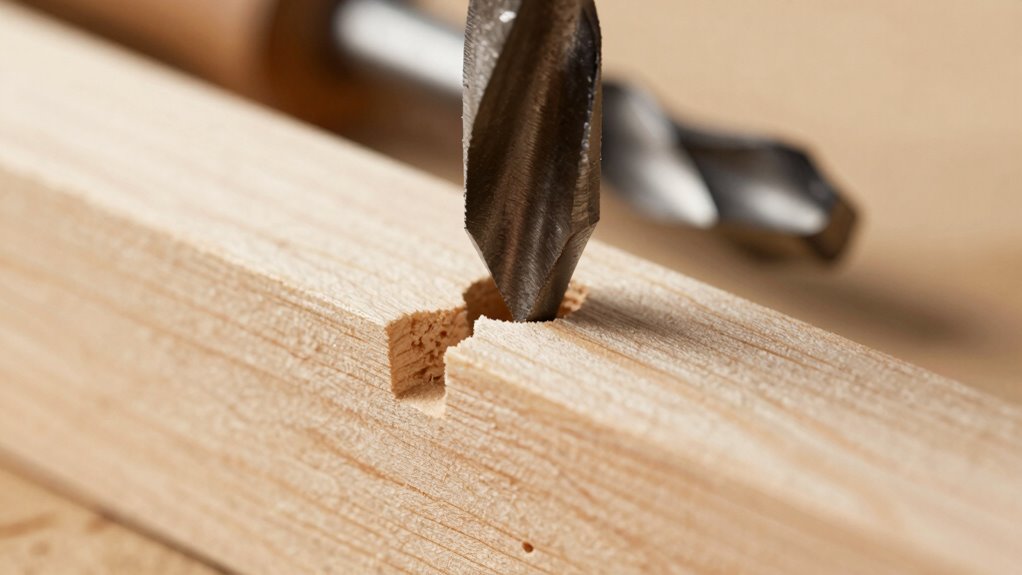
Accurate pocket hole positioning starts with precise marking, which guarantees strong joints and a professional finish. To achieve this, use a combination square or a marking gauge to measure the exact distance from the edge of your workpiece. Mark the drilling depth clearly on your drill bit or with a stop collar to ensure consistent pocket depth, preventing over- or under-drilling. When marking the pocket hole location, double-check measurements before drilling to avoid misalignment. Use a pencil or a fine-tip marker for clear, accurate lines. Employ a jig or guide to maintain consistent placement across multiple pieces. Properly marking the position and depth ensures your pocket holes are accurately placed, resulting in sturdy, clean joints that last. Additionally, understanding the importance of correct joint strength can help guide your technique for optimal results.
Proper Tool Alignment
Aligning your tools correctly is key to guaranteeing your pocket holes are positioned precisely. Start by setting your drill bit to the correct depth, so each hole is consistent and strong. Use a clamp technique to secure your workpiece firmly, preventing any slipping during drilling. When aligning, make sure the drill bit is perpendicular to the surface, which helps maintain proper angle and prevents misalignment. Double-check your markings and guarantee the drill bit is centered over your designated pocket hole location. Consistent clamp pressure and steady hands keep the workpiece stable. Proper tool alignment reduces errors, saves time, and results in cleaner, more professional joints. Taking these steps ensures your pocket holes are accurately placed and securely hold your project together. For added confidence, consult a reliable measuring tool to verify your positioning before drilling. Additionally, understanding the precision of robotic tools can help improve your accuracy during setup and alignment. Being aware of proper maintenance practices can also ensure your tools stay in optimal condition, contributing to more precise work. Regularly calibrating your equipment and inspecting it for wear helps maintain consistent accuracy, ultimately leading to better results. Incorporating proper calibration techniques can further enhance your drilling accuracy and joint quality.

660 PCS Pocket Hole Screws Assortment Kit, 5 Sizes #8 x 1, 1-1/4", 1-1/2", 2", 2-1/2",Square Drive Self Tapping Coarse Thread Wood Screws Set, Blue Coated and Zinc Coated, Drive Bit Included
Premium Material: All the screws are made of alloy steel coated with blue and galvanized layers,strong and durable…
As an affiliate, we earn on qualifying purchases.
As an affiliate, we earn on qualifying purchases.
Choosing the Right Angle for Different Pocket Hole Joints
Choosing the right angle for your pocket holes is key to creating strong, durable joints. You’ll want to ensure optimal angles for strength, adjusting them when flexibility is needed, and common angles for typical projects. Mastering these choices ensures your projects are both sturdy and professional-looking. Additionally, understanding safe installation practices helps prevent damage and ensures long-lasting results. Being aware of wood grain direction can also influence joint performance and longevity. To further enhance joint stability, considering fastener placement is essential for achieving optimal strength and alignment. Properly aligning the fasteners relative to the grain orientation reduces the risk of splitting and enhances overall joint integrity.
Optimal Angles for Strength
Selecting the right angle for pocket holes is essential to maximizing joint strength. Generally, drilling at a consistent speed ensures clean holes and prevents wood splitting, which is vital when working at ideal angles. For most projects, a 15-degree angle provides a strong, secure connection, especially when using the right screw selection. Using screws designed for pocket holes, like coarse-thread variants, enhances grip and reduces the risk of stripping. When you choose the correct angle, it distributes stress evenly across the joint, boosting durability. Keep in mind that different materials and joint types may require slight adjustments, but sticking to recommended angles and perfect drilling speeds will give you the strongest, most reliable pocket hole joints every time. Additionally, understanding the material properties helps in selecting the optimal angle for specific applications, ensuring enhanced strength and longevity. Proper drilling techniques also play a crucial role in achieving consistent and strong joints, especially when working with various wood types. Being aware of the wood density can guide you in adjusting your approach for different projects, improving joint performance. Moreover, considering the grain direction can further optimize the strength and appearance of your joints, especially in complex assemblies.
Adjusting for Joint Flexibility
Since joint flexibility varies depending on the application, adjusting your pocket hole angle is crucial for achieving ideal results. Flexibility impacts how well the joint handles stress and accommodates material expansion, especially in seasonal changes. To compensate, consider these factors:
- Increase the angle slightly for more flexible joints to reduce stress.
- Decrease the angle when working with rigid or dense materials to improve stability.
- Adjust for material expansion by setting angles that allow for movement without weakening the joint.
- Test on scrap pieces to find the best angle that balances strength and flexibility.
Common Angles for Projects
When working on different projects, selecting the appropriate pocket hole angle is vital for ensuring strong, durable joints. The angle impacts how the screw interacts with the wood grain and the overall strength of the connection. For most projects, a 15° to 20° angle offers a good balance between strength and appearance. Using the right screw length is also essential; longer screws provide better holding power, especially when joining thicker materials.
| Wood Grain Direction | Recommended Angle | Screw Length |
|---|---|---|
| Parallel to joint | 15°–20° | Longer screws for thick material |
| Perpendicular to joint | 10°–15° | Standard screw length |
| Cross grain | 20°–25° | Longer screws for stability |

Draxzor 3PCS Woodworking Ruler Set, Precision Pocket Ruler with Adjustable Slide Stop, Aluminum Alloy Measuring Tool for Marking & Scribing, Metal T-Track Square Rulers, Inch and Metric (6", 8", 12")
【All-in-One Marking Kit】Includes 3 precision rulers (6", 8", 12") with sliding stop blocks—ideal for accurate layout, repeatable cuts,…
As an affiliate, we earn on qualifying purchases.
As an affiliate, we earn on qualifying purchases.
Tips for Precise Positioning and Spacing of Pocket Holes

To guarantee strong joints and professional results, precise positioning and spacing of pocket holes are essential. Proper placement ensures the wood grain remains intact, reducing splitting and enhancing finish quality. Measure carefully, using a square or jig to maintain consistency across pieces. Keep these tips in mind:
- Align pocket holes along the wood grain for a cleaner look.
- Space holes evenly, typically 2-3 inches apart, to prevent weakening.
- Avoid placing holes too close to edges to minimize splitting.
- Use a jig or guide for consistent angles and spacing across multiple pieces.
Adjusting Pocket Hole Angles for Different Materials and Projects

Adjusting pocket hole angles is essential for ensuring strong joints across different materials and project types. When working with wood grain, you may need to change the angle to prevent splitting or grain tear-out, especially in softer woods. For thicker or denser materials, modifying the angle helps maintain proper screw engagement and maximizes holding power. Consider the screw length; longer screws often require a more precise angle to avoid protrusion or splitting. If you’re joining plywood or composite materials, a shallower angle can improve surface flushness and reduce stress. Always test your angle adjustments on scrap pieces to see how the wood reacts and to ensure the screw maintains good grip without damaging the material. Proper angle adjustments improve joint strength and durability across varied projects.
Common Pocket Hole Mistakes and How to Avoid Them
Many common pocket hole mistakes stem from overlooked details or rushing through the process. These errors can compromise joint durability and material compatibility, leading to weak or unstable connections. To avoid pitfalls, make sure you select the right screw length and type for your materials, preventing splitting or weak joints. Pay attention to proper hole depth and angle to maintain strength. Avoid over-tightening screws, which can damage the wood and reduce joint integrity. Also, don’t forget to drill pocket holes at consistent angles to ensure alignment.
Avoid pocket hole mistakes by choosing the right screw, drilling at consistent angles, and avoiding over-tightening for strong, durable joints.
- Use the appropriate screw for your material to prevent splitting.
- Keep pocket holes at consistent angles for proper joint fit.
- Don’t overtighten, as it weakens the joint.
- Match screw length and type with material thickness.
How to Test and Reinforce Your Pocket Hole Joints Before Assembly
Before you start assembling your project, it’s important to test your pocket hole joints for strength and stability. Ensuring your joints have good pocket hole durability prevents future issues. Use joint testing methods like applying gentle pressure or pulling on the joint to check for movement or looseness. If a joint feels weak, reinforce it by adding extra screws, glue, or adjusting the angle for better fit. Tighten screws properly but avoid over-tightening, which can weaken the joint. Double-check the alignment and make sure the pocket holes are clean and free of debris before testing. Reinforcing weak spots now saves time and effort later, leading to a more durable, long-lasting finished piece. Proper testing and reinforcement are key to creating a strong, reliable project.
Frequently Asked Questions
How Do I Determine the Ideal Pocket Hole Placement for Complex Shapes?
To determine the ideal pocket hole placement for complex shapes, you should focus on joint alignment and angle precision. Start by planning your joints carefully, ensuring they align properly for strength. Use a drill guide to maintain consistent angle accuracy, especially on curves or irregular surfaces. Measure and mark evenly, placing holes where they won’t weaken the structure. This approach guarantees secure, durable joints even in complex projects.
What Are the Signs of Weak or Failing Pocket Hole Joints?
If your pocket hole joints start to wobble or your screws loosen like they’re escaping, you’ve got a weak link. Watch for joint separation or a creaky, unstable feel—those are prime signs of failure. When your project begins to fall apart faster than your patience, it’s time to reinforce or redo your pocket holes. Don’t ignore these signs, or you’ll end up with a wobbly disaster instead of a sturdy masterpiece.
Can Pocket Holes Be Used Effectively in Outdoor Furniture?
Yes, you can use pocket holes effectively in outdoor furniture. To guarantee weather resistance, choose durable, outdoor-rated materials like treated wood or composite. Applying waterproof wood glue and sealing joints helps protect against moisture and temperature changes. Properly sealing and maintaining the pocket holes extend their longevity outdoors. By selecting the right materials and weatherproofing techniques, you’ll create sturdy, long-lasting outdoor furniture that withstands the elements.
How Does Wood Type Affect Pocket Hole Strength and Accuracy?
Think of pocket holes like a tight handshake—you want a firm grip for strength. Your choice of wood matters; dense woods like oak provide stronger, more accurate joints due to their grain direction and density. If you overlook grain flow, your pocket holes might weaken or misalign. So, selecting the right wood type and aligning grain correctly ensures your joints stay sturdy and precise, just like a confident handshake.
What Safety Precautions Should I Follow When Using Pocket Hole Tools?
When using pocket hole tools, always wear safety gear like goggles and ear protection to stay safe. Keep your workspace clean and follow proper tool maintenance to prevent malfunctions. Secure your wood firmly to avoid slips, and never force the tool if it jams. Always read the manufacturer’s instructions carefully, and unplug the tool when not in use. Staying alert and cautious guarantees safe, accurate pocket hole joinery.
Conclusion
By mastering proper pocket hole placement, you guarantee strong, durable joints every time. For example, when building a bookshelf, precise angle and spacing prevent wobbling and enhance stability. Remember, taking your time to measure and adjust angles makes all the difference. With the right techniques, you’ll create furniture that not only looks professional but also stands the test of time, giving you confidence in every project you tackle.