
Locking rabbet joints provide a quick, strong alternative to dovetails for drawers and furniture. They are created with stepped cuts that interlock easily, requiring less precision and craftsmanship. You can assemble them faster, saving time without sacrificing durability. These joints work well with softwoods and plywood, making them ideal for quick projects. If you want to master these efficient joints and achieve professional results, keep going for more helpful tips.
Key Takeaways
- Locking rabbet joints feature stepped cuts that interlock quickly, reducing assembly time compared to traditional dovetails.
- They require less precise fitting and craftsmanship, making them ideal for faster drawer construction.
- These joints provide strong, durable support suitable for softwood or plywood drawers.
- Proper tools like saws, chisels, and clamps ensure clean cuts and secure assembly, speeding up the process.
- Their unobtrusive appearance maintains aesthetic appeal while offering a time-efficient alternative to dovetails.
Why Woodworkers Are Choosing Locking Rabbet Joints Over Dovetails
Have you ever wondered why more woodworkers are opting for locking rabbet joints instead of traditional dovetails? The main reasons are joint strength and assembly speed. Locking rabbet joints provide solid support, ensuring your projects stay durable without complex cuts. They are easier to cut and assemble, saving you valuable time in the workshop. Unlike dovetails, which require precise fitting and detailed craftsmanship, locking rabbet joints can be assembled quickly, making them ideal for projects that need to move fast. They also offer enough strength for most furniture applications, especially when reinforced properly. Additionally, understanding the contrast ratio can help you better evaluate the visual quality of your finished piece if you’re considering a design that includes aesthetic elements. If you’re looking to streamline your woodworking process without sacrificing joint integrity, locking rabbet joints are an excellent choice that balances strength and efficiency.
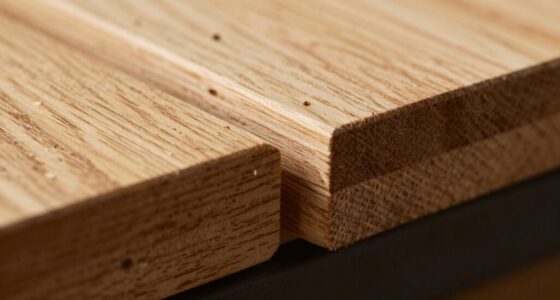
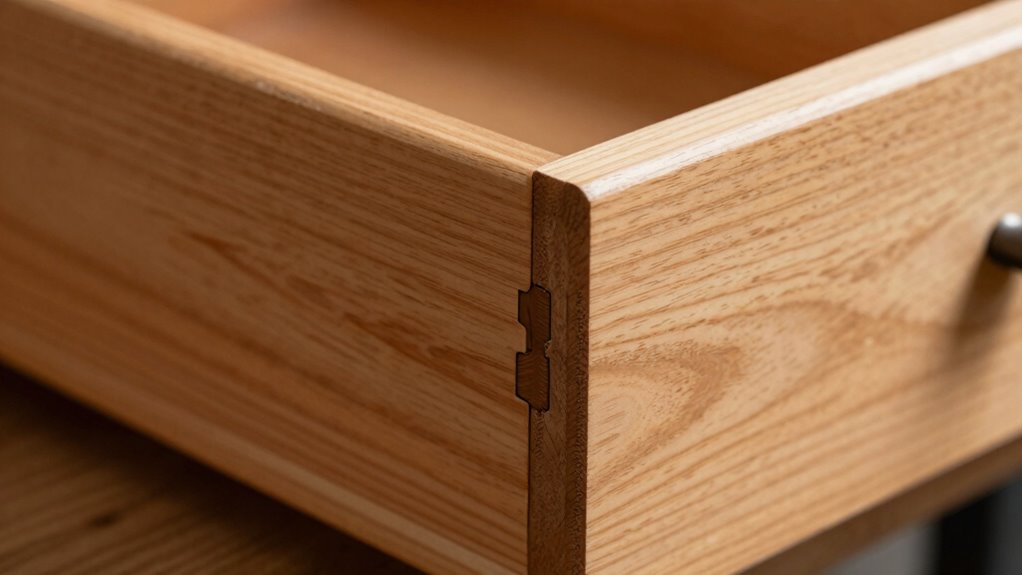
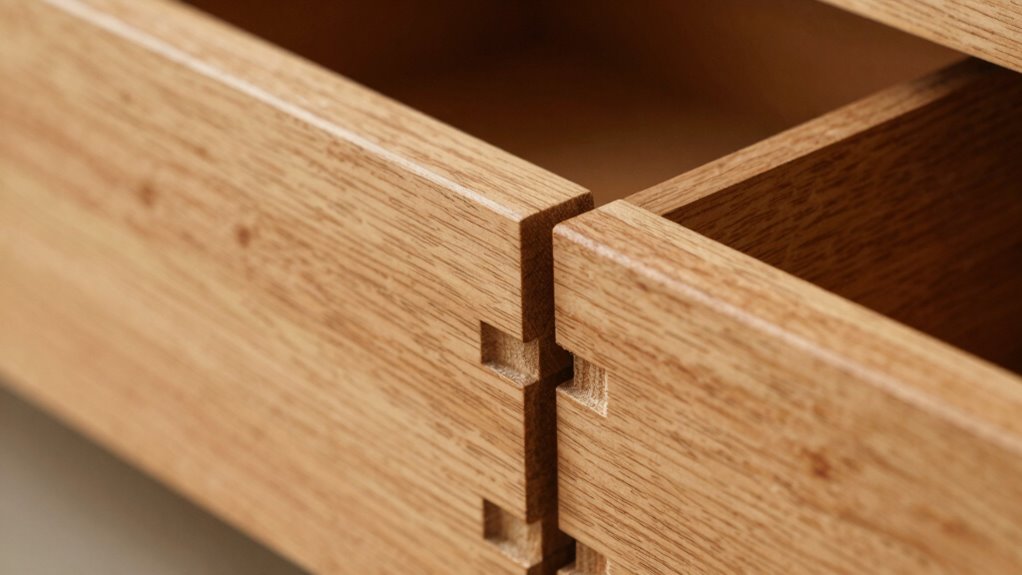
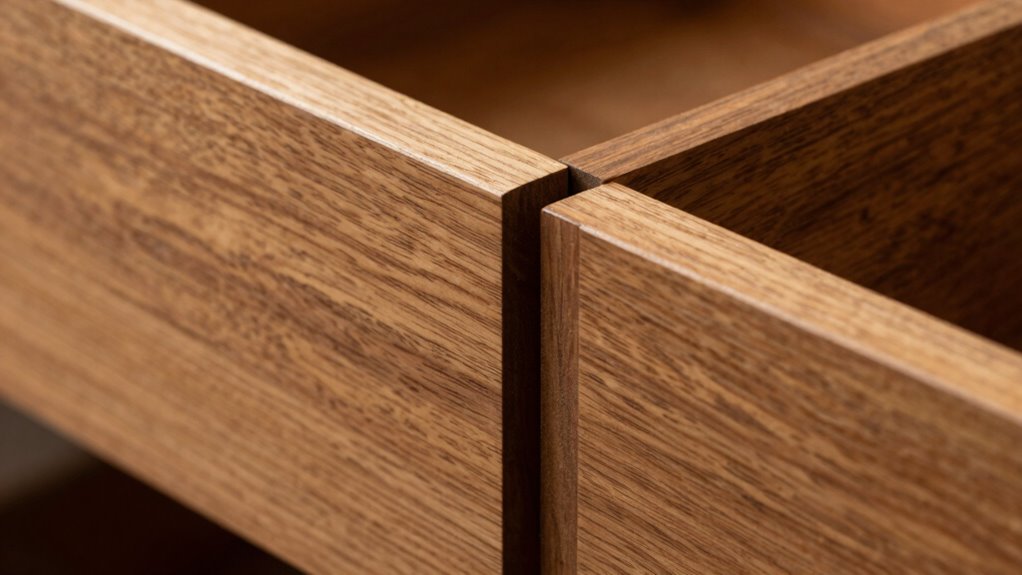
What Are Locking Rabbet Joints and How Do They Work?

Locking rabbet joints are a type of woodworking joint designed to securely connect two pieces of wood, often used in cabinetry and furniture making. They work by creating a stepped cut, or rabbet, on one piece that fits snugly into a corresponding notch on the other. This design enhances joint strength and guarantees stability. To understand how they work:
Locking rabbet joints create sturdy, interlocking connections for reliable woodworking stability.
- The rabbet is cut precisely into the edge of each piece.
- The joint is assembled with the rabbets fitting together.
- Additional locking features, like a spline or dowel, increase durability.
- Material compatibility is essential; hardwoods provide better joint strength than softwoods.
- Proper cut quality and measuring techniques ensure a tight, reliable fit.
This joint combines ease of assembly with solid strength, making it an efficient choice for many woodworking projects.
Tools and Materials Needed for Making Locking Rabbet Joints
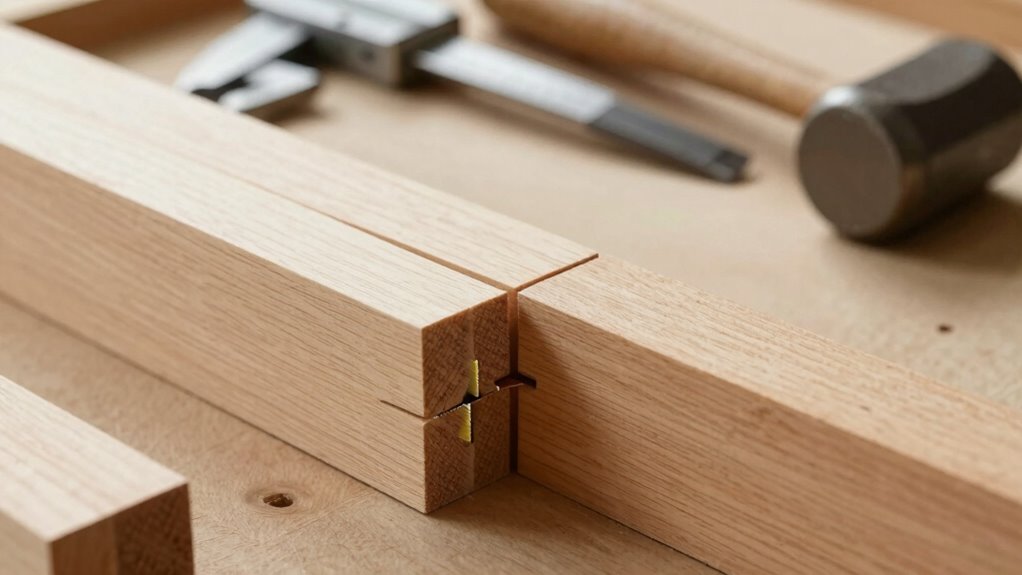
To create effective locking rabbet joints, you’ll need specific tools and materials that guarantee precise cuts and secure assembly. A quality saw, such as a table saw or radial arm saw, ensures clean, accurate cuts that maximize joint strength. A chisel and mallet help refine the rabbet and remove any splinters. Clamps are essential for holding pieces steady during assembly. For material compatibility, choose wood that responds well to your tools and cuts cleanly without splintering. A square or marking gauge guarantees accurate measurements, vital for joint strength. Additionally, good-quality glue can reinforce the joint if needed. Having the right tools and compatible materials makes the process smoother and results in durable, strong locking rabbet joints. Proper tool selection is crucial for achieving the best results in woodworking joints.
When Should You Use Locking Rabbet Joints in Your Projects?
You should consider using locking rabbet joints when building drawers, as they provide strong, reliable connections. They’re also great when you need quick assembly without sacrificing stability. Think about these joints whenever your project calls for efficiency and durability. Additionally, ensuring proper measurements and materials is crucial for optimal fit and strength.
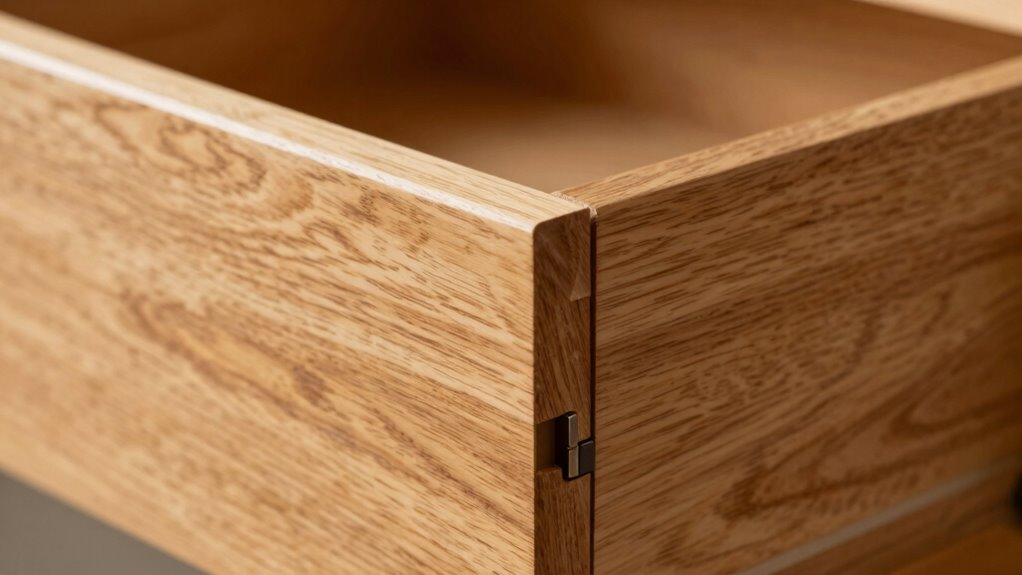
Suitable for Drawer Construction
Have you ever wondered when locking rabbet joints are the best choice for drawer construction? They excel in situations where material suitability and joint aesthetics matter. Use locking rabbet joints when working with softwoods or plywood, as they provide strong connections without complex joinery. They’re ideal for drawers that need quick assembly without sacrificing appearance. Consider these points:
- When you want a clean, seamless look in your drawer’s front face.
- For projects where time efficiency is important.
- If working with materials that don’t hold traditional dovetail joints well.
- When you desire a sturdy, yet visually unobtrusive joint.
- Understanding joint strength and material compatibility can help you choose the best fastening method for your project.
Locking rabbet joints balance strength and aesthetics, making them suitable for many drawer projects, especially when you want a fast, attractive finish.
Ideal for Quick Assembly
When quick assembly is a priority, locking rabbet joints shine as an efficient choice. Their joint design allows you to connect panels swiftly without extensive joinery, saving time on your project. This type of joint is particularly compatible with simple woodworking techniques, making it accessible for DIY enthusiasts and professionals alike. Using straightforward woodworking techniques, you can create strong, reliable joints with minimal fuss. Locking rabbet joints also reduce the need for complicated tools or procedures, streamlining your workflow. Whether you’re assembling a simple box or a more complex piece, this joint type accelerates the process without sacrificing durability. When efficiency is key, locking rabbet joints provide a practical solution, helping you complete projects faster while maintaining strong, precise connections.
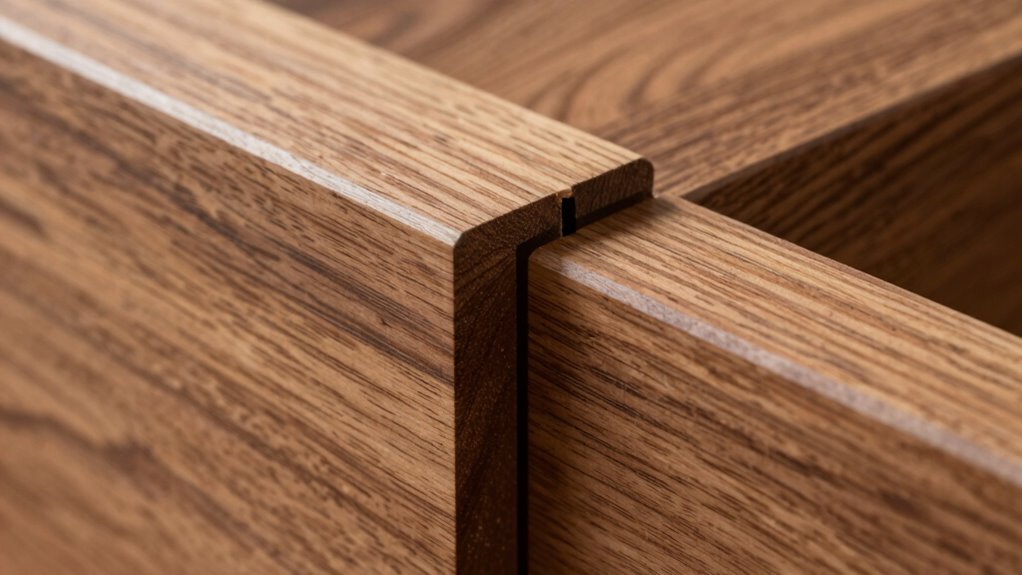
How to Cut a Locking Rabbet Joint Step by Step

Cutting a locking rabbet joint requires careful measurement and precise cuts to guarantee a secure fit. Accurate cuts ensure joint stability and material compatibility, preventing gaps or weak points. To achieve this, follow these steps: 1. Measure the thickness of the material to determine the rabbet’s depth. 2. Set your saw or router to match this depth for a snug fit. 3. Mark the cut lines clearly, aligning with your measurements. 4. Cut carefully along the lines, maintaining steady control to avoid inaccuracies. Additionally, understanding woodworking techniques can help refine your approach for cleaner, more precise joints.
Tips for Achieving Perfect, Strong Locking Rabbet Joints
Achieving a perfect, strong locking rabbet joint starts with precise measurements and careful execution. To maximize joint durability, verify your cuts are accurate and fit snugly without forcing. Check material compatibility; hardwoods like oak or maple provide better strength and stability, while softer woods may require additional reinforcement. Use sharp tools to prevent splintering and uneven edges that weaken the joint. Properly aligning the rabbet ensures maximum surface contact, which improves strength and durability. Test fit before final assembly, making adjustments as needed. Clamping firmly during glue-up helps create a tight bond, but avoid over-tightening, which can distort the joint. By focusing on precise measurements, material compatibility, and proper technique, you’ll craft locking rabbet joints that are both durable and reliable. Additionally, understanding the importance of correct joint design can significantly impact the strength and longevity of your project.
Common Mistakes to Avoid When Making Locking Rabbet Joints

One of the biggest mistakes you can make is taking inaccurate measurements, which can lead to a loose or misaligned joint. Applying glue poorly or unevenly weakens the connection and reduces strength. Rushing the assembly process often results in sloppy fit and compromised stability, so take your time to guarantee precision at every step. Additionally, embracing artistic expression and paying attention to detail can help ensure your joints are both functional and visually appealing.
Inaccurate Measurements
Have you ever measured a rabbet joint and found it didn’t fit quite right? Inaccurate measurements can ruin your project, so paying attention to measurement accuracy is essential. To avoid mistakes, consider these points:
- Double-check your measurements before cutting.
- Use a reliable marking gauge for consistent lines.
- Ensure your saw blade is set precisely to the correct depth.
- Take your time during cutting to maintain cutting precision.
- Regularly inspect your tools to ensure they are properly calibrated and functioning correctly, as tool calibration plays a critical role in achieving accurate cuts.
Small errors in measurement can lead to gaps or tight fits, making assembly difficult. Always verify your measurements multiple times and use proper tools to maintain accuracy. Precision in measurement directly impacts the quality of your locking rabbet joints, so don’t rush—accuracy is key to a perfect fit.
Poor Glue Application
Poor glue application is a common mistake that can compromise the strength and durability of your locking rabbet joints. If you don’t apply the glue evenly, it can lead to weak spots or gaps that affect joint alignment. Too much glue causes excess squeeze-out, making it harder to assemble precisely, while too little results in weak bonds. Proper glue application ensures the joint stays aligned during assembly and cures firmly. Use the right amount and spread it evenly for a tight, secure fit.
| Mistake | Consequence | Solution |
|---|---|---|
| Applying too much glue | Excess squeeze-out, misalignment | Use a thin, even coat |
| Applying too little glue | Weak joint, poor durability | Apply enough for full coverage |
| Uneven glue spread | Gaps, weak points | Use a brush or applicator |
| Not cleaning excess glue | Stains, joint issues | Wipe immediately after assembly |
| Ignoring joint alignment | Misaligned joints | Check fit before curing |
Rushing Assembly Process
Rushing the assembly process can lead to misaligned joints and weak connections in your locking rabbet joints. When you hurry, you risk compromising joint durability and diminishing woodworking aesthetics. Take your time to ensure precise measurements and proper alignment, which is essential for a strong, attractive joint.
Consider these common pitfalls:
- Skipping proper fitting—rushing can cause gaps that weaken the joint.
- Neglecting clamping—poor clamping leads to uneven pressure, affecting joint strength.
- Ignoring dry-fitting—skipping this step can result in misalignment during final assembly.
- Applying glue hastily—fast application without control reduces joint durability.
Avoid these mistakes to achieve clean, tight joints that last and look professional. Taking your time pays off in both strength and woodworking aesthetics.
Projects That Benefit Most From Locking Rabbet Joints
Locking rabbet joints excel in projects that require strong, durable corner connections, especially where stability is essential. They’re ideal for furniture like drawers, cabinets, and boxes that need to withstand frequent use. These joints provide excellent joint durability, ensuring your projects won’t loosen or weaken over time. Additionally, locking rabbet joints enhance woodworking aesthetics by creating clean, seamless corners without visible fasteners or elaborate joinery. This makes them perfect for projects where appearance matters. You’ll find locking rabbet joints particularly beneficial in quick assembly tasks that demand both strength and visual appeal. Their efficiency saves you time without sacrificing quality, making them a go-to choice for projects that prioritize durability and a refined look.
Troubleshooting and Improving Your Locking Rabbet Joints

Even the best locking rabbet joints can sometimes encounter issues that compromise their strength or appearance. To troubleshoot, focus on improving joint stability and material compatibility. First, check if the joint fits snugly; loose joints weaken stability. Second, ensure you’re using compatible materials—hardwoods often hold better than softwoods. Third, refine your cutting technique to achieve precise, clean rabbet cuts, which enhances fit and strength. Fourth, consider adding glue or reinforcement, especially in high-stress areas, to improve durability. Addressing these factors helps prevent joint failures and enhances overall performance. By paying close attention to fit, material choice, and proper assembly, you guarantee your locking rabbet joints remain strong, stable, and aesthetically pleasing over time.
Frequently Asked Questions
Can Locking Rabbet Joints Be Used With All Types of Wood?
Yes, you can use locking rabbet joints with most types of wood. However, consider wood compatibility and finishing considerations before proceeding. Softer woods like pine or cedar work well, but harder woods like oak or maple may require more precise cuts. Always test your joint and plan for appropriate finishing to guarantee durability and a clean appearance. Proper preparation ensures your locking rabbet joint performs well across various wood types.
How Do Locking Rabbet Joints Compare in Strength to Dovetails?
Locking rabbet joints generally offer comparable joint strength to dovetails, especially with appropriate material compatibility. You’ll find they excel in scenarios where quick assembly and ease of construction matter, although dovetails still provide superior mechanical strength in high-stress applications. For most woodworking projects, locking rabbet joints deliver enough strength, but if your project demands maximum durability, dovetails might still be the better choice.
Are Special Clamps Needed for Assembling Locking Rabbet Joints?
No, you don’t need special clamps for assembling locking rabbet joints. Standard clamps like bar clamps or C-clamps work well, as they help you maintain proper joint alignment during assembly. Focus on choosing the right clamp types to guarantee even pressure, which secures the joint tightly. Proper clamping makes assembly easier and ensures a strong, accurate fit without requiring specialized equipment.
Can Locking Rabbet Joints Be Disassembled and Reused?
Imagine gently loosening the joint like easing apart two puzzle pieces. Locking rabbet joints can be disassembled, making it easy to reuse them. The disassembly process involves carefully separating the joint without damaging it, so you can reassemble it later. This feature makes locking rabbet joints a practical choice for projects where you want to reuse components, saving time and materials while maintaining strong, secure connections.
What Are Common Signs of a Weak or Failing Locking Rabbet Joint?
You’ll notice joint separation or wobbling if your locking rabbet joint weakens. Glue failure can also cause it to loosen over time, especially if the joint wasn’t properly glued or if the adhesive has degraded. Cracks or gaps forming along the joint indicate it’s failing, and you might see the joint coming apart under stress. Regular inspection helps catch these issues early before significant damage occurs.
Conclusion
Locking rabbet joints are like a swift, sturdy handshake—offering strength and speed without the fuss of dovetails. With the right tools and a steady hand, you can craft joints that lock together seamlessly, turning your woodworking projects into a well-oiled machine. Embrace these joints as your secret weapon, making your craftsmanship stronger and faster, like a well-tuned racecar speeding down the track. Your projects will stand tall, proud, and perfectly connected.