
Use this guide to set up a cordless drill, choose suitable bits, and make accurate holes or drive screws into wood. It is written for beginners with a basic understanding of workshop safety; no prior drill experience is required. Allow 30-60 minutes to prepare and practise on scrap wood before working on your project.

Get tools and workshop supplies delivered free — and shop member deals
- Fast, free delivery on millions of items
- Access to Prime Big Deal Days deals on October 6–7
- Prime Video, Amazon Music and more included
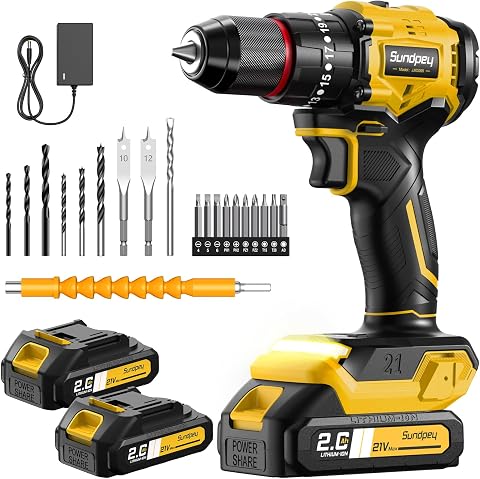
Sundpey 620 In-lb Brushless Cordless Drill Set – Yellow
- ✔ Motor: Brushless
- ✔ Maximum torque: 620 in-lb (70 Nm)
- ✔ Speed: 0–400 RPM low; 0–1,800 RPM high
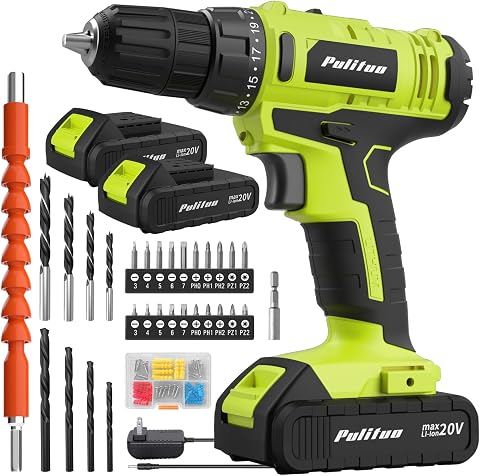
PULITUO 20V Cordless Drill/Driver with LED Light – 2 Batteries, 30Nm Torque, 2-Speed, Keyless 3/8-inch Chuck, Green
- ✔ Voltage: 20 V
- ✔ Maximum torque: 30 Nm (listed as 280 in-lb)
- ✔ Speed: 0–400 RPM low; 0–1,500 RPM high

DEKOPRO 20V Cordless Drill Set with Battery and Charger
- ✔ Voltage: 20 V
- ✔ Battery: One 1.5 Ah lithium-ion battery
- ✔ Weight: 2.5 pounds
Difficulty: Beginner | Time: 30-60 minutes for setup and practice
What You’ll Need
Tools & Materials:
- Cordless drill or drill-driver with a charged, compatible battery
- Wood drill bits, such as brad-point bits or twist bits suitable for wood
- Driver bits that match your screw heads
- Tape measure, pencil, and combination square or straightedge
- Clamps and a stable workbench
- Safety glasses
- Scrap wood of a similar type and thickness to your project
Knowledge:
- Basic workshop safety
- How to identify the drill’s trigger, chuck, forward/reverse control, and clutch settings
Check your drill manual for model-specific controls and battery instructions. Select screws, bits, and drilling depth to suit the wood and project. Keep loose clothing, hair, and jewelry clear of the drill, and remove the battery before changing a bit or making adjustments.
Sundpey 620 In-lb Brushless Cordless Drill Set – Yellow
The Sundpey 620 takes the top position because it combines the lineup’s highest stated torque with a brushless motor and two 2.0 Ah batteries. For woodworking, that combination is most useful when we are drilling a run of holes, driving longer fasteners, or switching between tasks without stopping every time a battery runs down. Its low-speed range starts at 0–400 RPM, giving us a measured setting for starting screws, while the high range reaches 1,800 RPM for quicker drilling in suitable materials.Its 23+3 torque settings and separate screwdriving, drilling, and hammer modes offer more adjustment than the DEKOPRO’s 18+1 settings. The hammer mode may help with occasional masonry work, but it is not a meaningful advantage for wood itself; buyers focused solely on woodworking should not pay attention to that mode as a reason to choose this drill. A 3/8-inch keyless chuck is practical for common bits, though it offers less capacity than a 1/2-inch chuck on some larger drills. The LED and battery display are also helpful when working inside cabinets or monitoring remaining charge.The main compromise is pack capacity and charging cadence: the two batteries are rated at 2.0 Ah each, and the stated charging time is 1.5 hours per battery. The listing’s approximate one-hour no-load runtime should not be read as a guarantee under drilling load. Compared with the PULITUO, Sundpey offers more stated torque and higher top speed, but the PULITUO may be a more straightforward choice for a smaller household tool kit. We would choose Sundpey when headroom and a spare pack matter more than minimizing cost, weight, or complexity.
Pros:
- Brushless motor and the highest stated torque in this group
- Two 2.0 Ah batteries support pack swapping during a project
- Variable speed, adjustable clutch, LED, and battery display
- Included assortment covers several common drilling and driving tasks
Cons:
- The 3/8-inch chuck limits the size of bits it can accept compared with larger-chuck drills
- Charging each battery takes a stated 1.5 hours, which can interrupt continuous work
- Hammer mode adds little value for woodworking, and runtime under load is not established
Best for: Woodworkers who frequently drill and drive fasteners, want a spare battery ready, and value the strongest stated power in this comparison.
Not ideal for: Buyers doing only occasional light assembly, or anyone who wants verified long runtime, a larger chuck, or a woodworking-only drill without extra modes.
Bottom line: Choose the Sundpey when woodworking jobs call for the most stated power and battery flexibility in this trio, while accepting its smaller chuck and charging limitations.
“Choose the Sundpey when woodworking jobs call for the most stated power and battery flexibility in this trio, while accepting its smaller chuck and charging limitations.”
PULITUO 20V Cordless Drill/Driver with LED Light – 2 Batteries, 30Nm Torque, 2-Speed, Keyless 3/8-inch Chuck, Green
The PULITUO 20V is the most balanced option for a home workshop where the same drill handles pilot holes, shelf installation, and furniture repairs. It supplies two batteries, an LED light, and a 21+1 clutch, giving it a practical mix of work continuity and screw control. Its low setting begins at 0–400 RPM, useful for easing into a pilot hole or seating a screw deliberately; the higher setting reaches 1,500 RPM. That is below the Sundpey’s 1,800 RPM maximum, but speed is only one part of a controlled woodworking setup.Against the DEKOPRO, PULITUO adds a second battery and a built-in light, which makes it easier to keep working and see inside corners or cabinets. Its listed maximum torque is 30 Nm (also given as 280 in-lb in the supplied specifications), substantially below Sundpey’s 70 Nm rating. That difference makes Sundpey the stronger choice for more demanding fastening, while PULITUO’s output is a reasonable fit for routine home projects. Its 3/8-inch chuck and included 34-piece kit cover common small-scale needs, including wood bits, screwdriver bits, an extension bar, and a flexible shaft.There are limits to the “two batteries” advantage: each pack is only 1.5 Ah, so we should not assume long uninterrupted sessions, especially when drilling repeatedly. The stated 1,500 RPM maximum is also the lowest top speed in this lineup. For most furniture assembly and ordinary board work, those tradeoffs matter less than the added pack and LED; for larger boring jobs or frequent heavy fastening, the Sundpey has more headroom. PULITUO is the sensible middle choice, not the pick for maximum power or the lightest handling.
Pros:
- Two batteries help reduce pauses for recharging
- 21+1 torque settings support controlled screw driving
- Built-in LED improves visibility in confined work areas
- Broad 34-piece accessory kit includes wood and screwdriver bits
Cons:
- Each battery is 1.5 Ah, which may mean more frequent swaps on larger jobs
- Its 1,500 RPM maximum is lower than the other listed speed ceilings
- Stated torque is well below the Sundpey’s, limiting its appeal for tougher fastening
Best for: DIY woodworkers who want two batteries, an LED, and adjustable screw control in a kit for everyday home projects.
Not ideal for: People who regularly drill large holes, need higher top speed or more torque, or prefer a single compact, low-weight tool.
Bottom line: The PULITUO is our balanced home-workshop pick when a spare battery and built-in light matter more than maximum torque or top speed.
“The PULITUO is our balanced home-workshop pick when a spare battery and built-in light matter more than maximum torque or top speed.”
DEKOPRO 20V Cordless Drill Set with Battery and Charger
For shorter projects and a first cordless drill, the DEKOPRO 20V stands out for its stated 2.5-pound weight and uncomplicated setup. The two-speed range of 0–350 and 0–1,350 RPM gives us a slower mode for controlled screw starts and a faster one for ordinary drilling. With 18+1 torque settings, it also provides basic clutch adjustment to help limit overdriving screws into softer wood. Its included battery, charger, drill bits, and screwdriver bits mean we can begin common household woodworking tasks without assembling a separate starter kit.Compared with the PULITUO, DEKOPRO is lighter according to the supplied specification, but it gives up the second battery and LED. That makes it a better match for brief jobs where portability and simple handling matter more than work continuity. The Sundpey has far more stated torque, a brushless motor, and two higher-capacity batteries, so it is the clearer choice for repeated demanding work. DEKOPRO’s lower maximum speed and 1.5 Ah battery are not major concerns for assembling a small project, but they become more noticeable when drilling many holes or working through a long build.There is no built-in LED, a real inconvenience when we need to see a mark in a cabinet or a shaded corner. The kit’s accessory count is useful, though a large assortment does not tell us whether every supplied bit suits the material or hole size at hand. We would treat this as a portable, entry-level option rather than a workshop workhorse. Its appeal is straightforward handling; buyers who expect longer sessions should move up to one of the two-battery kits.
Pros:
- Stated weight of 2.5 pounds makes it the lightest-feeling choice on paper
- Two speed settings and 18+1 torque levels suit basic drilling and screw control
- Battery and charger are included for a complete starter setup
- Kit contains both drill bits and screwdriver bits
Cons:
- Single 1.5 Ah battery offers less capacity and no ready spare
- No built-in LED for shaded or confined work areas
- Lower stated top speed and no comparable high-torque brushless specification
Best for: Beginners and occasional DIY woodworkers who prioritize a light drill and a ready-to-use set for furniture assembly and smaller projects.
Not ideal for: Woodworkers tackling long sessions, repeated large-hole drilling, or dim work areas where an LED and spare battery are important.
Bottom line: Choose DEKOPRO for light, occasional woodworking where easy handling matters more than extended runtime, lighting, or high torque.
“Choose DEKOPRO for light, occasional woodworking where easy handling matters more than extended runtime, lighting, or high torque.”
As an Amazon Associate we earn from qualifying purchases.
Before You Start
Use a drill-driver for drilling and screwdriving; do not use it for tasks that require a hammer drill or impact driver unless the tool is designed for that use. Wear safety glasses, secure the work, and keep both hands positioned so the bit cannot catch your fingers. Do not hold small pieces of wood by hand while drilling.
Check the wood for nails, screws, and other obstructions before drilling. Plan where holes and fasteners will go, and check what lies behind or beneath the workpiece. If you are drilling near an edge, use a pilot hole and a suitable bit to reduce splitting.
Step-by-Step Instructions
Step 1: Inspect and secure the workpiece
Place the wood on a stable workbench or support it securely. Clamp it so it cannot shift, and position the clamps away from the planned hole or screw location. Mark the center of each hole or the point where each screw should enter. Check that the drill path will not reach the bench, clamps, or anything behind the wood.
Tip: For a hole that must pass through the board, place scrap wood underneath the workpiece. This supports the fibers as the bit exits and reduces tear-out.
Check: The board stays still when you press it by hand, and the marked point and drilling path are clear.
Step 2: Choose the right bit
Match the bit to the job. Use a wood bit with a pointed tip for a clean, accurately placed hole; use a twist bit rated for wood if that is what you have. Choose a bit diameter that matches the hole or the screw’s pilot-hole requirements. For driving, select a driver bit that fits the screw head snugly, without wobble.
Check that the bit is straight and undamaged. A bent, blunt, or chipped bit can wander, overheat, or damage the wood and screw head.
Tip: For a screw pilot hole, the hole is generally narrower than the screw’s outside diameter. The right size depends on the screw and wood species; consult the screw maker’s guidance or test on matching scrap.
Check: The bit matches the task, fits securely in the chuck, and has no visible damage.
Step 3: Fit the bit and check the drill controls
Remove the battery before changing bits. Open the chuck, insert the bit straight and far enough to grip its shank, then tighten the chuck firmly according to the drill’s instructions. Refit the battery. Set the forward/reverse control to forward for drilling or driving, and set the drill to the low-speed range for better control when starting a hole or screw.
For screwdriving, start with a low clutch setting. The clutch limits turning force and can help prevent the screw from sinking too far. For drilling, use the drill setting rather than a screwdriving clutch setting if your model provides one.
Tip: Keep fingers clear of the chuck while tightening it. Never hold a rotating bit or chuck to stop it.
Check: The bit sits straight, the chuck is tight, and the direction and speed controls match the task.
Step 4: Practise on scrap wood
Clamp a piece of scrap similar to your project material. Hold the drill with a firm, balanced grip and line the bit up with a mark. Place the bit tip on the mark before squeezing the trigger. Start slowly, then increase pressure on the trigger as the bit begins cutting. Let the bit do the work; do not force it.
For screwdriving, keep the driver bit aligned with the screw head and apply steady pressure along the screw’s axis. Start at low speed and stop when the screw is seated. If the clutch slips before the screw is seated, raise its setting gradually and test again.
Tip: Practise the planned hole depth and screw setting before moving to the finished piece. A drill’s trigger may provide variable speed, but the amount of control varies by model.
Check: The test hole starts on the mark without wandering, or the test screw sits straight without stripping or sinking too deeply.
Step 5: Drill a hole
Position the bit tip on the mark and hold the drill as straight as the project requires. Start the drill at low speed. Keep the drill steady as the bit cuts, using moderate pressure rather than pushing hard. For a deep hole, withdraw the bit occasionally while it is stopped or turning slowly, as appropriate for the bit, to clear chips and reduce binding.
Stop when you reach the required depth. For a through-hole, ease pressure as the bit approaches the far face so it exits with less tear-out. Release the trigger and wait for the bit to stop before moving the drill.
Tip: Use a depth stop if your drill has one. Otherwise, mark the desired depth on the bit with tape, keeping the tape well away from the cutting edge.
Check: The hole is in the marked location, reaches the intended depth, and has no major tear-out or burn marks.
Step 6: Drive a screw into wood
Make a pilot hole when the screw, wood, or location calls for one, especially near an edge or in dense wood. Fit the matching driver bit and place the screw tip in the hole or on the marked point. Hold the drill in line with the screw, start slowly, and maintain steady forward pressure as the screw advances.
Release the trigger as soon as the screw head reaches the intended position. If the screw is not fully seated, adjust the clutch one setting at a time or finish carefully by hand. Do not continue driving after the head is flush if the project does not call for countersinking.
Tip: If the driver bit slips, stop and check that it matches the screw head and is fully seated. Continuing to drive while it slips can damage the screw.
Check: The screw is straight, secure, and at the intended depth, with an undamaged head and no split wood.
Step 7: Power down and inspect the result
Release the trigger and wait for all rotation to stop. Remove the battery before changing bits or clearing a jam. Brush away wood chips with the drill powered off, then check the hole or fastener against your project marks and measurements. Check the opposite face of the board as well if the bit passed through.
Remove the bit only after the drill is powered down. Store the drill and bits safely, and recharge the battery following the manufacturer’s instructions.
Tip: If a bit is hot, let it cool before handling it. Do not touch its cutting edges immediately after drilling.
Check: The finished work matches the planned position and depth, and the tool is switched off with the battery removed before storage or bit changes.
Common Mistakes to Avoid
- Starting a hole with the bit tilted or off the mark. — Place the bit tip on the mark before starting, use low speed at first, and hold the drill steady. Practise on scrap if accuracy matters.
- Using excessive force while drilling or driving. — Apply steady, moderate pressure and let the bit cut. Too much force can cause binding, wandering, overheating, or a damaged screw head.
- Driving a screw without a suitable pilot hole. — Check the screw maker’s guidance and drill a pilot hole when working near an edge, in hardwood, or with a screw that risks splitting the wood.
- Using a loose or mismatched bit. — Tighten the chuck securely and match the driver bit to the screw head. Stop immediately if the bit wobbles or slips.
Troubleshooting
Problem: The bit wanders away from the mark.
Solution: Stop the drill, reposition the tip, and restart at low speed with the drill held steady. Check that the bit is sharp and suitable for wood; use a small pilot hole if needed.
Problem: The wood splits while driving a screw.
Solution: Stop driving. Remove the screw if practical, drill an appropriately sized pilot hole, and try again. Move the screw farther from the edge if the design allows.
Problem: The screw head strips or the driver bit slips.
Solution: Stop before the damage gets worse. Check that the driver bit matches the screw head and is seated fully. Replace a worn bit or damaged screw, then drive at lower speed with steady pressure.
Problem: The drill stalls or the bit binds.
Solution: Release the trigger and wait for the bit to stop. Remove the battery before freeing the bit. Check for a jam, a dull or unsuitable bit, or excessive pressure; clear chips and restart slowly.
What Success Looks Like
Your work is successful when each hole or screw is in the intended location and reaches the planned depth, the wood has no unwanted splitting or severe tear-out, and screw heads remain undamaged. The drill should have run without repeated stalling, slipping, or uncontrolled movement. Confirm measurements and fit against the project before proceeding to assembly or finishing.
Next Steps
Continue with the next marked holes or fasteners, checking alignment as you go rather than waiting until the entire piece is assembled. Clean sawdust from the work area and inspect bits for wear before storing them. Remove the battery for storage or maintenance, and follow the drill maker’s directions for charging. If holes need a cleaner finish, consider practising with backing scrap, a sharper bit, or a slower feed on offcuts before working on visible surfaces.
Frequently Asked Questions
Can I use a cordless drill to make holes and drive screws?
Yes. A drill-driver can do both with the right bit and settings. Use a wood drill bit for holes, and a matching driver bit with a low clutch setting for screws. Follow the tool manual for the controls on your model.
Should I drill a pilot hole for every wood screw?
Not always. Pilot holes are especially helpful near board edges, in hardwood, or when the screw is large. Follow the fastener maker’s guidance and test on similar scrap to reduce the risk of splitting.
What speed should I use for woodworking?
Start slowly so the bit or screw stays under control. Use the drill’s low-speed range for starting holes and driving screws, then adjust based on the material, bit, and tool instructions. Avoid forcing the drill.
How do I stop a drill bit from tearing the wood as it exits?
Clamp scrap wood tightly behind the workpiece so the bit cuts into the backing as it exits. You can also ease pressure as the bit nears the far face. For a blind hole, set a depth stop or mark the target depth.
When should I use a hammer drill instead?
Use a hammer drill’s hammer mode for masonry, not ordinary wood drilling. For wood, switch hammer mode off. Check the tool manual before changing modes, and use a tool rated for any specialized task.
Fall yard work Picks
leaf blowers
As an affiliate, we earn on qualifying purchases.